 QingYo
环境概览
如前文所提到的这个网络拓扑:
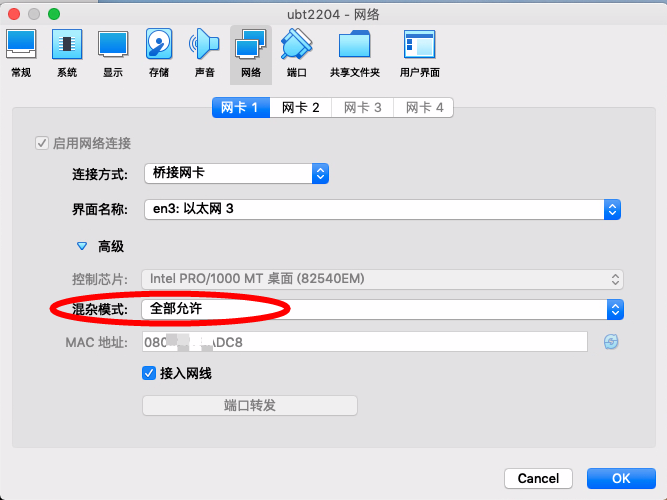
我们在PC上接入两条网线到主路由,分别对应PC的en0和en3。本文所涉及的操作都在这个PC进行,通过Virtualbox虚拟出两台机器,一台是Ubuntu22.04 作为服务端(下文称之为U-Router),一台是AlmaLinux8作为验证的客户端(下文称之为A-Node),两个机器都桥接到PC上的en3接口,虚拟机内部网卡名为enp0s3。这个接口对应路由器的eth1,是作为uplink的br0的一员,因此我们能通过这个网络接口直接进行PPPoE拨号。为了实现在虚拟机上拨号,我们还需要设置虚拟网卡为混杂模式。
运营商对于多拨一般是有限制的,我这边可以实现四拨,超过四个拨号连接就会失败。
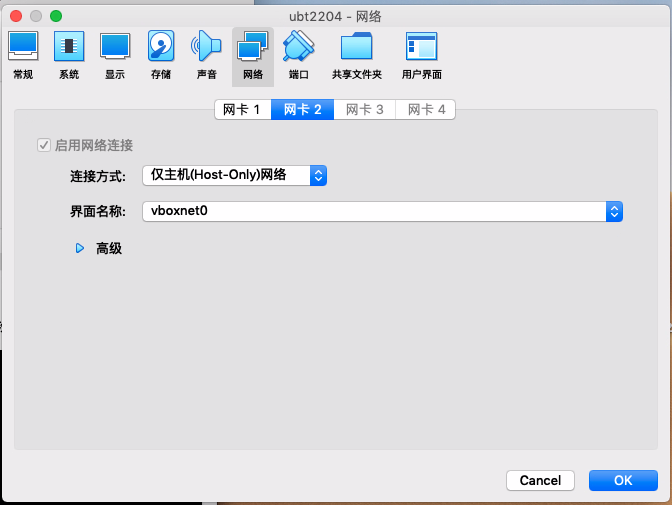
两个虚拟机还附加了一个Host-Only网络,内部网卡名为enp0s8,主要用于验证IPv6自动配置的过程:
PPPoE拨号设置
安装PPPoE软件包
在进行其他实验前,我们需要在U-Router上拨号,获取IPv6地址。U-Router目前的网卡信息如下:
root@hlxd:~# ip addr
1: lo: <LOOPBACK,UP,LOWER_UP> mtu 65536 qdisc noqueue state UNKNOWN group default qlen 1000
    link/loopback 00:00:00:00:00:00 brd 00:00:00:00:00:00
    inet 127.0.0.1/8 scope host lo
       valid_lft forever preferred_lft forever
    inet6 ::1/128 scope host
       valid_lft forever preferred_lft forever
2: enp0s3: <BROADCAST,MULTICAST,UP,LOWER_UP> mtu 1500 qdisc fq_codel state UP group default qlen 1000
    link/ether 08:00:x:x:ad:c8 brd ff:ff:ff:ff:ff:ff
    inet 192.168.1.2/24 metric 100 brd 192.168.1.255 scope global dynamic enp0s3
       valid_lft 553940633sec preferred_lft 553940633sec
    inet6 fe80::a00:27ff:fe7b:adc8/64 scope link
       valid_lft forever preferred_lft forever
3: enp0s8: <BROADCAST,MULTICAST,UP,LOWER_UP> mtu 1500 qdisc fq_codel state UP group default qlen 1000
    link/ether 08:00:x:x:4b:e9 brd ff:ff:ff:ff:ff:ff
    inet 192.168.56.103/24 metric 100 brd 192.168.56.255 scope global dynamic enp0s8
       valid_lft 580sec preferred_lft 580sec
    inet6 fe80::a00:27ff:fe0f:4be9/64 scope link
       valid_lft forever preferred_lft forever
这里的enp0s3就是我们连接到主路由uplink的接口,后面可以通过它进行拨号。 为了实现拨号,我们需要安装pppoe软件包,目前这个机器不具备上公网的条件,我们可以通过临时网卡切换,将enp0s8桥接到宿主机的en0口(这是宿主机上网的接口),以接入公网
NIC 2: MAC: 0800270F4BE9, Attachment: Bridged Interface 'en0: 以太网 2', Cable connected: on, Trace: off (file: none), Type: 82540EM, Reported speed: 0 Mbps, Boot priority: 0, Promisc Policy: allow-all, Bandwidth group: none
3: enp0s8: <BROADCAST,MULTICAST,UP,LOWER_UP> mtu 1500 qdisc fq_codel state UP group default qlen 1000
    link/ether 08:00:x:x:4b:e9 brd ff:ff:ff:ff:ff:ff
    inet 192.168.x.92/24 metric 100 brd 192.168.x.255 scope global dynamic enp0s8
       valid_lft 85696sec preferred_lft 85696sec
    inet6 2409:x:x:x:a00:x:x:4be9/64 scope global dynamic mngtmpaddr noprefixroute
       valid_lft 179289sec preferred_lft 92889sec
    inet6 240e:x:x:x:a00:x:x:4be9/64 scope global dynamic mngtmpaddr noprefixroute
       valid_lft 690986sec preferred_lft 604586sec
    inet6 fe80::a00:x:x:4be9/64 scope link
       valid_lft forever preferred_lft forever
执行如下指令安装
root@hlxd:~# apt-get update
root@hlxd:~# apt install pppoe
将网卡切换回仅主机网络:
NIC 2: MAC: 0800270F4BE9, Attachment: Host-only Interface 'vboxnet0', Cable connected: on, Trace: off (file: none), Type: 82540EM, Reported speed: 0 Mbps, Boot priority: 0, Promisc Policy: allow-all, Bandwidth group: none
配置PPPoE
在U-Router机器/etc/ppp/peers/下面新建一个pppoe_dial的文件,内容如下:
# Located in /etc/ppp/peers/pppoe_dial
# Print debug info
#debug
logfile /var/log/pppoe_dial/run.log

# interface name
ifname pppoe_dial # 虚拟网卡名称设置为pppoe_dial

# Keep pppd in terminal
nodetach

# Set default route
defaultroute

# Do not set PPP compression
ipcp-accept-local
ipcp-accept-remote
local


# Set PPPoE used interface
plugin pppoe.so enp0s3 # PPPoE使用的实际网卡名称

# Username & password
user "13800001111" # 你的上网用户名
password "110011" # 你的上网密码
noauth
# Hide password when print connect info
hide-password

# 启用IPv6
# Use IPv6

+ipv6
ipv6cp-use-ipaddr
ipv6cp-accept-local
ipv6cp-accept-remote
ipv6cp-max-failure 100
ipv6cp-restart 2

# Set default route v6
defaultroute6
usepeerdns

# Conn check
lcp-echo-interval 60 # Ping sending interval
lcp-echo-failure 10 # Times of ping failure tolerance

# Reconnect
persist
maxfail 10
holdoff 1

# PPPoE compliant settings.
noaccomp
default-asyncmap
mtu 1452
这里我们指定了usepeerdns后,pppd会将从上游获取的DNS服务器通过DNS1和DNS2这两个环境变量传递给/etc/ppp/ip-up ,同时/etc/ppp/ip-up.d/0000usepeerdns这个文件也会被执行。
/etc/ppp/ip-up.d/0000usepeerdns修改/etc/resolv.conf的前提是/sbin/resolvconf存在且systemd-resolved没有启动。
对于这篇文章来说,配置文件中的+ipv6是个重要设置,通过这个配置可以让PPPoE拨号后获取IPv6地址。
创建拨号服务,新建一个/etc/systemd/system/pppoe_dial.service文件,内容如下:
# Located in /etc/systemd/system/pppoe_dial.service
[Unit]
Description=PPPoE auto dial
After=systemd-networkd.service
StartLimitBurst=5
StartLimitIntervalSec=120

[Service]
User=root
ExecStartPre=-/bin/sh -ec '\
    /usr/bin/mkdir -p /var/log/pppoe_dial'
ExecStart=pppd call pppoe_dial
ExecStop=poff pppoe_dial
Restart=always
RestartSec=10s

[Install]
WantedBy=multi-user.target
开始拨号
root@hlxd:/etc/ppp/peers# systemctl start pppoe_dial
root@hlxd:/etc/ppp/peers# ip addr
1: lo: <LOOPBACK,UP,LOWER_UP> mtu 65536 qdisc noqueue state UNKNOWN group default qlen 1000
    link/loopback 00:00:00:00:00:00 brd 00:00:00:00:00:00
    inet 127.0.0.1/8 scope host lo
       valid_lft forever preferred_lft forever
    inet6 ::1/128 scope host
       valid_lft forever preferred_lft forever
2: enp0s3: <BROADCAST,MULTICAST,UP,LOWER_UP> mtu 1500 qdisc fq_codel state UP group default qlen 1000
    link/ether 08:00:x:x:ad:c8 brd ff:ff:ff:ff:ff:ff
    inet 192.168.1.2/24 metric 100 brd 192.168.1.255 scope global dynamic enp0s3
       valid_lft 553938398sec preferred_lft 553938398sec
    inet6 fe80::a00:27ff:fe7b:adc8/64 scope link
       valid_lft forever preferred_lft forever
3: enp0s8: <BROADCAST,MULTICAST,UP,LOWER_UP> mtu 1500 qdisc fq_codel state UP group default qlen 1000
    link/ether 08:00:x:x:4b:e9 brd ff:ff:ff:ff:ff:ff
    inet 192.168.56.103/24 metric 100 brd 192.168.56.255 scope global dynamic enp0s8
       valid_lft 388sec preferred_lft 388sec
    inet6 fe80::a00:27ff:fe0f:4be9/64 scope link
       valid_lft forever preferred_lft forever
6: pppoe_dial: <POINTOPOINT,MULTICAST,NOARP,UP,LOWER_UP> mtu 1452 qdisc fq_codel state UNKNOWN group default qlen 3
    link/ppp
    inet 218.x.x.174 peer 218.x.x.1/32 scope global pppoe_dial
       valid_lft forever preferred_lft forever
    inet6 240e:x:x:d5d5:cf53:x:x:9363/64 scope global temporary dynamic
       valid_lft 259200sec preferred_lft 85978sec
    inet6 240e:x:x:d5d5:fce7:x:x:3deb/64 scope global dynamic mngtmpaddr
       valid_lft 259200sec preferred_lft 172800sec
    inet6 fe80::fce7:x:x:3deb peer fe80::8646:x:x:ea97/128 scope link
       valid_lft forever preferred_lft forever
调试连接
我们尝试ping百度的域名:
root@hlxd:~# ping www.baidu.com
^C
root@hlxd:~#
发现无法ping通。首先检查DNS解析配置:
root@hlxd:~# cat /etc/resolv.conf
# This is /run/systemd/resolve/stub-resolv.conf managed by man:systemd-resolved(8).
# Do not edit.
#
# This file might be symlinked as /etc/resolv.conf. If you're looking at
# /etc/resolv.conf and seeing this text, you have followed the symlink.
#
# This is a dynamic resolv.conf file for connecting local clients to the
# internal DNS stub resolver of systemd-resolved. This file lists all
# configured search domains.
#
# Run "resolvectl status" to see details about the uplink DNS servers
# currently in use.
#
# Third party programs should typically not access this file directly, but only
# through the symlink at /etc/resolv.conf. To manage man:resolv.conf(5) in a
# different way, replace this symlink by a static file or a different symlink.
#
# See man:systemd-resolved.service(8) for details about the supported modes of
# operation for /etc/resolv.conf.

nameserver 127.0.0.53
options edns0 trust-ad
search .
这里用了systemd-resolved,所以我们可以通过如下指令检查系统的dns解析状态:
home@hlxd:~$ resolvectl status
Global
       Protocols: -LLMNR -mDNS -DNSOverTLS DNSSEC=no/unsupported
resolv.conf mode: stub

Link 2 (enp0s3)
    Current Scopes: DNS
         Protocols: +DefaultRoute +LLMNR -mDNS -DNSOverTLS DNSSEC=no/unsupported
Current DNS Server: 192.168.1.1
       DNS Servers: 192.168.1.1

Link 3 (enp0s8)
Current Scopes: none
     Protocols: -DefaultRoute +LLMNR -mDNS -DNSOverTLS DNSSEC=no/unsupported


Link 17 (pppoe_dial)
Current Scopes: none
     Protocols: -DefaultRoute +LLMNR -mDNS -DNSOverTLS DNSSEC=no/unsupported
从上面的查询结果我们可以看到,目前系统上只有enp0s3这个接口获取到DNS解析服务器,获取到的地址为192.168.1.1。这个地址是光猫下发的,但是实际上192.168.1.1上并不提供DNS查询功能。 我们可以查询下enp0s3的网络配置:
root@hlxd:/etc/netplan# cat 00-installer-config.yaml
# This is the network config written by 'subiquity'
network:
  ethernets:
    enp0s3:
      dhcp4: true
    enp0s8:
      dhcp4: true
  version: 2
由于目前DNS是通过DHCP获取的,我们可以通过静态ip配置的方式手工指定下ip和DNS服务器:
root@hlxd:/etc/netplan# netplan try
Do you want to keep these settings?


Press ENTER before the timeout to accept the new configuration


Changes will revert in 119 seconds
Configuration accepted.
root@hlxd:/etc/netplan# cat 00-installer-config.yaml
# This is the network config written by 'subiquity'
network:
  ethernets:
    enp0s3:
      addresses: [192.168.1.2/24]
      nameservers:
        addresses: [223.5.5.5]
    enp0s8:
      dhcp4: true
  version: 2
调整后的解析状态:
root@hlxd:/etc/netplan# resolvectl status
Global
       Protocols: -LLMNR -mDNS -DNSOverTLS DNSSEC=no/unsupported
resolv.conf mode: stub

Link 2 (enp0s3)
    Current Scopes: DNS
         Protocols: +DefaultRoute +LLMNR -mDNS -DNSOverTLS DNSSEC=no/unsupported
Current DNS Server: 223.5.5.5
       DNS Servers: 223.5.5.5

Link 3 (enp0s8)
Current Scopes: none
     Protocols: -DefaultRoute +LLMNR -mDNS -DNSOverTLS DNSSEC=no/unsupported

Link 17 (pppoe_dial)
Current Scopes: none
     Protocols: -DefaultRoute +LLMNR -mDNS -DNSOverTLS DNSSEC=no/unsupported
发起一次查询:
root@hlxd:/etc/netplan# dig www.baidu.com

; <<>> DiG 9.18.1-1ubuntu1.3-Ubuntu <<>> www.baidu.com
;; global options: +cmd
;; Got answer:
;; ->>HEADER<<- opcode: QUERY, status: SERVFAIL, id: 9100
;; flags: qr aa rd ra; QUERY: 1, ANSWER: 0, AUTHORITY: 0, ADDITIONAL: 1

;; OPT PSEUDOSECTION:
; EDNS: version: 0, flags:; udp: 65494
;; QUESTION SECTION:
;www.baidu.com.                 IN      A

;; Query time: 3051 msec
;; SERVER: 127.0.0.53#53(127.0.0.53) (UDP)
......
;; MSG SIZE  rcvd: 42
依然是不通的,我们ping一下dns服务器:
root@hlxd:/etc/netplan# ping 223.5.5.5
ping: connect: Network is unreachable
路由可能有问题:
root@hlxd:/etc/netplan# ip route show
114.x.x.1 dev pppoe_dial proto kernel scope link src 114.x.x.58
192.168.1.0/24 dev enp0s3 proto kernel scope link src 192.168.1.2
192.168.56.0/24 dev enp0s8 proto kernel scope link src 192.168.56.103 metric 100
现在系统已经没有默认路由了,在我们将enp0s3从DHCP修改成静态之前,这边的默认路由应该是到192.168.1.1,那个路由是错误的,由于那条错误默认路由的存在,导致我们的PPPoE不能将自己获取的网关设置成系统默认路由。由于现在已经不从DHCP自动获取错误默认路由,我们可以通过重新拨号,以设置正确的默认路由:
root@hlxd:/etc/netplan# systemctl restart pppoe_dial
root@hlxd:/etc/netplan# ip route show
default dev pppoe_dial scope link
114.x.x.1 dev pppoe_dial proto kernel scope link src 114.x.x.58
192.168.1.0/24 dev enp0s3 proto kernel scope link src 192.168.1.2
192.168.56.0/24 dev enp0s8 proto kernel scope link src 192.168.56.103 metric 100
root@hlxd:/etc/netplan# ip addr
......
18: pppoe_dial: <POINTOPOINT,MULTICAST,NOARP,UP,LOWER_UP> mtu 1452 qdisc fq_codel state UNKNOWN group default qlen 3
    link/ppp
    inet 114.x.x.58 peer 114.x.x.1/32 scope global pppoe_dial
       valid_lft forever preferred_lft forever
    inet6 240e:x:x:4d6c:f6f8:x:x:b876/64 scope global temporary dynamic
       valid_lft 259190sec preferred_lft 85988sec
    inet6 240e:x:x:4d6c:c48d:x:x:3911/64 scope global dynamic mngtmpaddr
       valid_lft 259190sec preferred_lft 172790sec
    inet6 fe80::c48d:x:x:3911 peer fe80::8646:x:x:ea97/128 scope link
       valid_lft forever preferred_lft forever
再次尝试域名解析,解析正常:
root@hlxd:/etc/netplan# resolvectl status
Global
       Protocols: -LLMNR -mDNS -DNSOverTLS DNSSEC=no/unsupported
resolv.conf mode: stub

Link 2 (enp0s3)
    Current Scopes: DNS
         Protocols: +DefaultRoute +LLMNR -mDNS -DNSOverTLS DNSSEC=no/unsupported
Current DNS Server: 223.5.5.5
       DNS Servers: 223.5.5.5

Link 3 (enp0s8)
Current Scopes: none
     Protocols: -DefaultRoute +LLMNR -mDNS -DNSOverTLS DNSSEC=no/unsupported

Link 18 (pppoe_dial)
Current Scopes: none
     Protocols: -DefaultRoute +LLMNR -mDNS -DNSOverTLS DNSSEC=no/unsupported
root@hlxd:/etc/netplan# dig www.baidu.com

; <<>> DiG 9.18.1-1ubuntu1.3-Ubuntu <<>> www.baidu.com
;; global options: +cmd
;; Got answer:
;; ->>HEADER<<- opcode: QUERY, status: NOERROR, id: 13378
;; flags: qr rd ra; QUERY: 1, ANSWER: 3, AUTHORITY: 0, ADDITIONAL: 1

;; OPT PSEUDOSECTION:
; EDNS: version: 0, flags:; udp: 65494
;; QUESTION SECTION:
;www.baidu.com.                 IN      A

;; ANSWER SECTION:
www.baidu.com.          41      IN      CNAME   www.a.shifen.com.
www.a.shifen.com.       41      IN      A       180.101.50.242
www.a.shifen.com.       41      IN      A       180.101.50.188

;; Query time: 24 msec
;; SERVER: 127.0.0.53#53(127.0.0.53) (UDP)
......
;; MSG SIZE  rcvd: 101
root@hlxd:/etc/netplan# ping www.baidu.com
PING www.a.shifen.com (180.101.50.242) 56(84) bytes of data.
64 bytes from 180.101.50.242 (180.101.50.242): icmp_seq=1 ttl=55 time=3.40 ms
64 bytes from 180.101.50.242 (180.101.50.242): icmp_seq=2 ttl=55 time=3.30 ms
验证连接
我们可以测试下主机连接IPv6网站的能力:
home@hlxd:~$ curl -v https://test.ipw.cn/
*   Trying 240e:e9:900e:22:3e::12:443...
* Connected to test.ipw.cn (240e:e9:900e:22:3e::12) port 443 (#0)
* ALPN, offering h2
* ALPN, offering http/1.1
*  CAfile: /etc/ssl/certs/ca-certificates.crt
*  CApath: /etc/ssl/certs
* TLSv1.0 (OUT), TLS header, Certificate Status (22):
* TLSv1.3 (OUT), TLS handshake, Client hello (1):
* TLSv1.2 (IN), TLS header, Certificate Status (22):
* TLSv1.3 (IN), TLS handshake, Server hello (2):
* TLSv1.2 (IN), TLS header, Certificate Status (22):
* TLSv1.2 (IN), TLS handshake, Certificate (11):
* TLSv1.2 (IN), TLS header, Certificate Status (22):
* TLSv1.2 (IN), TLS handshake, Server key exchange (12):
* TLSv1.2 (IN), TLS header, Certificate Status (22):
* TLSv1.2 (IN), TLS handshake, Server finished (14):
* TLSv1.2 (OUT), TLS header, Certificate Status (22):
* TLSv1.2 (OUT), TLS handshake, Client key exchange (16):
* TLSv1.2 (OUT), TLS header, Finished (20):
* TLSv1.2 (OUT), TLS change cipher, Change cipher spec (1):
* TLSv1.2 (OUT), TLS header, Certificate Status (22):
* TLSv1.2 (OUT), TLS handshake, Finished (20):
* TLSv1.2 (IN), TLS header, Finished (20):
* TLSv1.2 (IN), TLS header, Certificate Status (22):
* TLSv1.2 (IN), TLS handshake, Finished (20):
* SSL connection using TLSv1.2 / ECDHE-RSA-AES128-GCM-SHA256
* ALPN, server accepted to use h2
* Server certificate:
*  subject: CN=test.ipw.cn
*  start date: Sep 24 00:00:00 2022 GMT
*  expire date: Sep 24 23:59:59 2023 GMT
*  subjectAltName: host "test.ipw.cn" matched cert's "test.ipw.cn"
*  issuer: C=CN; O=TrustAsia Technologies, Inc.; CN=TrustAsia RSA DV TLS CA G2
*  SSL certificate verify ok.
* Using HTTP2, server supports multiplexing
* Connection state changed (HTTP/2 confirmed)
* Copying HTTP/2 data in stream buffer to connection buffer after upgrade: len=0
* TLSv1.2 (OUT), TLS header, Supplemental data (23):
* TLSv1.2 (OUT), TLS header, Supplemental data (23):
* TLSv1.2 (OUT), TLS header, Supplemental data (23):
* Using Stream ID: 1 (easy handle 0x563304eabe90)
* TLSv1.2 (OUT), TLS header, Supplemental data (23):
> GET / HTTP/2
> Host: test.ipw.cn
> user-agent: curl/7.81.0
> accept: */*
>
* TLSv1.2 (IN), TLS header, Supplemental data (23):
* Connection state changed (MAX_CONCURRENT_STREAMS == 128)!
* TLSv1.2 (OUT), TLS header, Supplemental data (23):
* TLSv1.2 (IN), TLS header, Supplemental data (23):
* TLSv1.2 (IN), TLS header, Supplemental data (23):
* TLSv1.2 (IN), TLS header, Supplemental data (23):
< HTTP/2 200
< access-control-allow-origin: https://ipw.cn
< content-type: application/json;charset=UTF-8
< date:
< server: SLT-MID
< x-cache-lookup: Cache Miss
< content-length: 37
< x-nws-log-uuid: 8039001920621619864
< x-cache-lookup: Cache Miss
<
* TLSv1.2 (IN), TLS header, Supplemental data (23):
* Connection #0 to host test.ipw.cn left intact
240e:x:x:a137:a872:x:x:c03d
根据上面命令的执行结果,我们可以确认当前主机已经接入到IPv6公网。
PPPoE DNS配置
通过networkd配置文件设置DNS服务器
以下内容为DNS相关的拓展发散,实际实验环境以上面一小节的调整为准。 让我们回退到原始的netplan配置:
root@hlxd:/etc/netplan# ip route show
default via 192.168.1.1 dev enp0s3 proto dhcp src 192.168.1.2 metric 100
192.168.1.0/24 dev enp0s3 proto kernel scope link src 192.168.1.2 metric 100
192.168.1.1 dev enp0s3 proto dhcp scope link src 192.168.1.2 metric 100
192.168.56.0/24 dev enp0s8 proto kernel scope link src 192.168.56.103 metric 100
221.x.x.1 dev pppoe_dial proto kernel scope link src 221.x.x.118
root@hlxd:/etc/netplan# cat 00-installer-config.yaml
# This is the network config written by 'subiquity'
network:
  ethernets:
    enp0s3:
      dhcp4: true
    enp0s8:
      dhcp4: true
  version: 2
root@hlxd:/etc
在这种配置下,我们是没法解析域名的:
root@hlxd:/etc/netplan# resolvectl status
Global
       Protocols: -LLMNR -mDNS -DNSOverTLS DNSSEC=no/unsupported
resolv.conf mode: stub

Link 2 (enp0s3)
Current Scopes: DNS
     Protocols: +DefaultRoute +LLMNR -mDNS -DNSOverTLS DNSSEC=no/unsupported
   DNS Servers: 192.168.1.1

Link 3 (enp0s8)
Current Scopes: none
     Protocols: -DefaultRoute +LLMNR -mDNS -DNSOverTLS DNSSEC=no/unsupported

Link 7 (pppoe_dial)
Current Scopes: none
     Protocols: -DefaultRoute +LLMNR -mDNS -DNSOverTLS DNSSEC=no/unsupported
DNS里的192.168.1.1是不可用,即便是我们设置外部dns,比如223.5.5.5,这个地址也是无法ping通,因为默认路由不是pppoe获取到的网关:
root@hlxd:/etc/netplan# ping 223.5.5.5
PING 223.5.5.5 (223.5.5.5) 56(84) bytes of data.
^C
--- 223.5.5.5 ping statistics ---
2 packets transmitted, 0 received, 100% packet loss, time 1013ms
这个时候,我们还有一种把dns配置到链路上(也就是)方式,可以实现dns解析。我们创建一个/etc/systemd/network/20-ppp.network 文件:
root@hlxd:/etc/systemd/network# cat 20-ppp.network
[Match]
Type = ppp

[Network]
DNS=223.5.5.5
执行指令networkctl reload并重新拨号使之生效,再次查询域名:
root@hlxd:/etc/systemd/network# networkctl reload
root@hlxd:/etc/systemd/network# systemctl restart pppoe_dial
root@hlxd:/etc/systemd/network# dig www.baidu.com

; <<>> DiG 9.18.1-1ubuntu1.3-Ubuntu <<>> www.baidu.com
;; global options: +cmd
;; Got answer:
;; ->>HEADER<<- opcode: QUERY, status: NOERROR, id: 7635
;; flags: qr rd ra; QUERY: 1, ANSWER: 3, AUTHORITY: 0, ADDITIONAL: 1

;; OPT PSEUDOSECTION:
; EDNS: version: 0, flags:; udp: 65494
;; QUESTION SECTION:
;www.baidu.com.                 IN      A

;; ANSWER SECTION:
www.baidu.com.          93      IN      CNAME   www.a.shifen.com.
www.a.shifen.com.       93      IN      A       180.101.50.188
www.a.shifen.com.       93      IN      A       180.101.50.242

;; Query time: 11 msec
;; SERVER: 127.0.0.53#53(127.0.0.53) (UDP)
......
;; MSG SIZE  rcvd: 101
我们发现域名已经可以正常解析了,当然这个域名还是ping不通的,因为我们的默认路由还是错误的。
root@hlxd:/etc/systemd/network# ping www.baidu.com
PING www.a.shifen.com (180.101.50.242) 56(84) bytes of data.
^C
--- www.a.shifen.com ping statistics ---
2 packets transmitted, 0 received, 100% packet loss, time 1020ms

root@hlxd:/etc/systemd/network#
root@hlxd:/etc/systemd/network# ip route show
default via 192.168.1.1 dev enp0s3 proto dhcp src 192.168.1.2 metric 100
117.x.x.1 dev pppoe_dial proto kernel scope link src 117.x.x.206
192.168.1.0/24 dev enp0s3 proto kernel scope link src 192.168.1.2 metric 100
192.168.1.1 dev enp0s3 proto dhcp scope link src 192.168.1.2 metric 100
192.168.56.0/24 dev enp0s8 proto kernel scope link src 192.168.56.103 metric 100
root@hlxd:/etc/systemd/network#
我们查看下解析服务的状态:
root@hlxd:/etc/systemd/network# resolvectl status
Global
       Protocols: -LLMNR -mDNS -DNSOverTLS DNSSEC=no/unsupported
resolv.conf mode: stub

Link 2 (enp0s3)
    Current Scopes: DNS
         Protocols: +DefaultRoute +LLMNR -mDNS -DNSOverTLS DNSSEC=no/unsupported
Current DNS Server: 192.168.1.1
       DNS Servers: 192.168.1.1

Link 3 (enp0s8)
Current Scopes: none
     Protocols: -DefaultRoute +LLMNR -mDNS -DNSOverTLS DNSSEC=no/unsupported

Link 9 (pppoe_dial)
    Current Scopes: DNS
         Protocols: +DefaultRoute +LLMNR -mDNS -DNSOverTLS DNSSEC=no/unsupported
Current DNS Server: 223.5.5.5
       DNS Servers: 223.5.5.5
pppoe下面已经多了223.5.5.5这个dns服务端地址,解析时是直接走pppoe链路:
root@hlxd:/etc/systemd/network# resolvectl query www.baidu.com
www.baidu.com: 180.101.50.242                  -- link: pppoe_dial
               180.101.50.188                  -- link: pppoe_dial
               (www.a.shifen.com)

-- Information acquired via protocol DNS in 13.7ms.
-- Data is authenticated: no; Data was acquired via local or encrypted transport: no
-- Data from: network
PPPoE自身的DNS配置
pppoe交互过程中其实已经从BRAS服务端获取到DNS配置。我们可以看一下如下日志:
root@hlxd:/var/log# tail -20 syslog
MMM DD 02:04:06 hlxd pppd[7150]: Connect: pppoe_dial <--> enp0s3
MMM DD 02:04:06 hlxd systemd-networkd[826]: ppp0: Interface name change detected, renamed to pppoe_dial.
MMM DD 02:04:06 hlxd networkd-dispatcher[847]: WARNING:Unknown index 9 seen, reloading interface list
MMM DD 02:04:06 hlxd systemd-udevd[7156]: ppp0: Could not set offload features, ignoring: No such device
MMM DD 02:04:06 hlxd systemd-udevd[7156]: Using default interface naming scheme 'v249'.
MMM DD 02:04:06 hlxd systemd-networkd[826]: pppoe_dial: Link UP
MMM DD 02:04:06 hlxd systemd-networkd[826]: pppoe_dial: Gained carrier
MMM DD 02:04:06 hlxd systemd-udevd[7168]: Using default interface naming scheme 'v249'.
MMM DD 02:04:06 hlxd pppd[7150]: CHAP authentication succeeded: Authentication success,Welcome!
MMM DD 02:04:06 hlxd pppd[7150]: CHAP authentication succeeded
MMM DD 02:04:06 hlxd pppd[7150]: peer from calling number F8:75:88:81:BE:21 authorized
MMM DD 02:04:06 hlxd systemd-networkd[826]: pppoe_dial: Gained IPv6LL
MMM DD 02:04:06 hlxd pppd[7150]: not replacing existing default route via gateway
MMM DD 02:04:06 hlxd pppd[7150]: local  LL address fe80::5dd1:bece:f176:585b
MMM DD 02:04:06 hlxd pppd[7150]: remote LL address fe80::fa75:88ff:fe81:be21
MMM DD 02:04:06 hlxd pppd[7150]: not replacing default route to enp0s3 [192.168.1.1]
MMM DD 02:04:06 hlxd pppd[7150]: local  IP address 117.89.13.206
MMM DD 02:04:06 hlxd pppd[7150]: remote IP address 117.89.12.1
MMM DD 02:04:06 hlxd pppd[7150]: primary   DNS address 218.2.2.2
MMM DD 02:04:06 hlxd pppd[7150]: secondary DNS address 218.4.4.4
root@hlxd:/var/log#
从上面的日志我们可以看到,pppoe拨号过程中我们获得了218.2.2.2和218.4.4.4这两个DNS服务器。这两个地址会记录到如下文件中:
root@hlxd:/etc/ppp# cat resolv.conf
nameserver 218.2.2.2
nameserver 218.4.4.4
同时这两个地址也会以DNS1和DNS2的方式传递到/etc/ppp/ip-up这个脚本中。 pppoe对DNS还有一个处理,就是在/etc/ppp/ip-up.d/0000usepeerdns文件,如果系统已经安装了/sbin/resolvconf,并且DNS没有被 systemd-resolved托管,则会将/etc/ppp/resolv.conf里的DNS合并进/etc/resolv.conf中。
DHCP Client配置
安装wide-dhcpv6-client
我们现在完成了PPPoE拨号,并且DNS和默认路由问题也已经解决,因此可以通过在线的apt源进行软件安装。Ubuntu自带的源里默认有wide-dhcpv6-client,不需要引入第三方仓库:
root@hlxd:~# apt install wide-dhcpv6-client
Reading package lists... Done
Building dependency tree... Done
Reading state information... Done
The following packages were automatically installed and are no longer required:
  libflashrom1 libftdi1-2
Use 'apt autoremove' to remove them.
The following additional packages will be installed:
  libfl2 sharutils
Suggested packages:
  sharutils-doc bsd-mailx | mailx
The following NEW packages will be installed:
  libfl2 sharutils wide-dhcpv6-client
0 upgraded, 3 newly installed, 0 to remove and 0 not upgraded.
Need to get 243 kB of archives.
After this operation, 876 kB of additional disk space will be used.
Do you want to continue? [Y/n] Y
Get:1 http://cn.archive.ubuntu.com/ubuntu jammy/universe amd64 sharutils amd64 1:4.15.2-5build1 [143 kB]
Get:2 http://cn.archive.ubuntu.com/ubuntu jammy/main amd64 libfl2 amd64 2.6.4-8build2 [10.7 kB]
Get:3 http://cn.archive.ubuntu.com/ubuntu jammy/universe amd64 wide-dhcpv6-client amd64 20080615-23build1 [90.0 kB]
Fetched 243 kB in 17s (14.3 kB/s)
Preconfiguring packages ...
Selecting previously unselected package sharutils.
(Reading database ... 109995 files and directories currently installed.)
Preparing to unpack .../sharutils_1%3a4.15.2-5build1_amd64.deb ...
Unpacking sharutils (1:4.15.2-5build1) ...
Selecting previously unselected package libfl2:amd64.
Preparing to unpack .../libfl2_2.6.4-8build2_amd64.deb ...
Unpacking libfl2:amd64 (2.6.4-8build2) ...
Selecting previously unselected package wide-dhcpv6-client.
Preparing to unpack .../wide-dhcpv6-client_20080615-23build1_amd64.deb ...
Unpacking wide-dhcpv6-client (20080615-23build1) ...
Setting up libfl2:amd64 (2.6.4-8build2) ...
Setting up sharutils (1:4.15.2-5build1) ...
Setting up wide-dhcpv6-client (20080615-23build1) ...
Generating /etc/wide-dhcpv6/dhcp6cctlkey...
Generating /etc/default/wide-dhcpv6-client...
Job for wide-dhcpv6-client.service failed because the control process exited with error code.
See "systemctl status wide-dhcpv6-client.service" and "journalctl -xeu wide-dhcpv6-client.service" for details.
invoke-rc.d: initscript wide-dhcpv6-client, action "start" failed.
× wide-dhcpv6-client.service - LSB: Start/Stop WIDE DHCPv6 client
     Loaded: loaded (/etc/init.d/wide-dhcpv6-client; generated)
     Active: failed (Result: exit-code) since WWW YYYY-MM-DD 03:03:54 UTC; 5ms ago
       Docs: man:systemd-sysv-generator(8)
    Process: 45713 ExecStart=/etc/init.d/wide-dhcpv6-client start (code=exited, status=1/FAILURE)
        CPU: 9ms

MMM DD 03:03:52 hlxd systemd[1]: Starting LSB: Start/Stop WIDE DHCPv6 client...
MMM DD 03:03:52 hlxd wide-dhcpv6-client[45713]:  * Starting WIDE DHCPv6 client dhcp6c
MMM DD 03:03:54 hlxd wide-dhcpv6-client[45713]:    ...fail!
MMM DD 03:03:54 hlxd systemd[1]: wide-dhcpv6-client.service: Control process exited, code=exited, status=1/FAILURE
MMM DD 03:03:54 hlxd systemd[1]: wide-dhcpv6-client.service: Failed with result 'exit-code'.
MMM DD 03:03:54 hlxd systemd[1]: Failed to start LSB: Start/Stop WIDE DHCPv6 client.
Processing triggers for libc-bin (2.35-0ubuntu3.1) ...
Processing triggers for man-db (2.10.2-1) ...
Processing triggers for install-info (6.8-4build1) ...
Scanning processes...
Scanning candidates...
Scanning linux images...

Running kernel seems to be up-to-date.

Restarting services...
Service restarts being deferred:
 /etc/needrestart/restart.d/dbus.service
 systemctl restart networkd-dispatcher.service
 systemctl restart systemd-logind.service
 systemctl restart unattended-upgrades.service
 systemctl restart [email protected]

No containers need to be restarted.

No user sessions are running outdated binaries.

No VM guests are running outdated hypervisor (qemu) binaries on this host.
首次安装过程中会弹出一个窗口,提示需要向哪个接口发起DHCPv6请求,相关配置会保存到/etc/default/wide-dhcpv6-client中。
禁用systemd-networkd自带的DHCPv6客户端
从上面的安装过程日志可以看出服务启动失败了,我们可以cong/var/log/syslog中查看相关的失败日志:
MMM DD 03:08:53 hlxd systemd[1]: Starting LSB: Start/Stop WIDE DHCPv6 client...
MMM DD 03:08:53 hlxd wide-dhcpv6-client[46535]:  * Starting WIDE DHCPv6 client dhcp6c
MMM DD 03:08:53 hlxd dhcp6c[46539]: client6_init: bind: Address already in use
MMM DD 03:08:55 hlxd wide-dhcpv6-client[46535]:    ...fail!
MMM DD 03:08:55 hlxd systemd[1]: wide-dhcpv6-client.service: Control process exited, code=exited, status=1/FAILURE
MMM DD 03:08:55 hlxd systemd[1]: wide-dhcpv6-client.service: Failed with result 'exit-code'.
MMM DD 03:08:55 hlxd systemd[1]: Failed to start LSB: Start/Stop WIDE DHCPv6 client.
失败的原因是bind: Address already in use,DHCPv6 交互过程中涉及到546和547两个端口,其中,客户端需要监听546端口。我们检查下这个端口的占用情况:
root@hlxd:/var/log# ss -anp|grep 546
u_str ESTAB  0      0                                                       * 113546                 * 117015 users:(("udisksd",pid=45362,fd=2),("udisksd",pid=45362,fd=1))
u_str ESTAB  0      0                             /run/systemd/journal/stdout 117015                 * 113546 users:(("systemd-journal",pid=31489,fd=21),("systemd",pid=1,fd=117))
udp   UNCONN 0      0                       [fe80::a00:27ff:fe7b:adc8]%enp0s3:546                 [::]:*      users:(("systemd-network",pid=31479,fd=23))
从上面的结果可以发现,目前systemd-networkd在enp0s3上占用了这个端口。 解决这个冲突有两种方式,一种是停用systemd-networkd,然后拉起wide-dhcpv6-client,让wide-dhcpv6-client先占用这个端口,后面再启动systemd-networkd。另一种方式想办法禁用enp0s3上的ipv6,比如通过禁止ipv6的link-local方式,禁用这个接口上的ipv6。 前一种方式有个麻烦的地方,就是systemd-networkd服务停止后,systemd-networkd.socket又会把它拉起来。
root@hlxd:/var/log# systemctl stop systemd-networkd
Warning: Stopping systemd-networkd.service, but it can still be activated by:
  systemd-networkd.socket
root@hlxd:/var/log#
当然我们也可以先停止systemd-networkd.socket,再停止systemd-networkd,停完之后,可能机器就失联了,因为没有任何高阶的网络管理服务维护网络配置。如果确实需要停systemd-networkd,我们可以先安装ifupdown这个软件包,再配置好/etc/network/interface文件,这样可以把networking这个服务启动起来,当systemd-networkd停止后,networking服务继续接管网络配置。 后一种方式相对简单,我们只需要在netplan中加一个配置就行:
root@hlxd:/etc/netplan# cat 00-installer-config.yaml
# This is the network config written by 'subiquity'
network:
  ethernets:
    enp0s3:
      addresses: [192.168.1.2/24]
      link-local: []
      nameservers:
        addresses: [223.5.5.5]
    enp0s8:
      dhcp4: true
  version: 2
root@hlxd:/etc/netplan# netplan try
Do you want to keep these settings?


Press ENTER before the timeout to accept the new configuration


Changes will revert in 120 seconds
Configuration accepted.
root@hlxd:/etc/netplan# ss -anp|grep 546
u_str ESTAB  0      0                                                       * 113546                 * 117015 users:(("udisksd",pid=45362,fd=2),("udisksd",pid=45362,fd=1))
u_str ESTAB  0      0                             /run/systemd/journal/stdout 117015                 * 113546 users:(("systemd-journal",pid=31489,fd=21),("systemd",pid=1,fd=66))
这里的link-local可以设置成ipv4或者置空,只要不是ipv6就行,配置生效之后,对应的546监听就没有了。
我们也可以深入了解systemd-networkd为什么要监听546,可以用man systemd.network查询到如下配置信息:
IPv6AcceptRA=
           Takes a boolean. Controls IPv6 Router Advertisement (RA) reception support for the interface. If true, RAs are accepted; if false, RAs are ignored. When RAs are accepted, they may trigger the start of the DHCPv6 client if the relevant flags are set in the RA data, or if no routers are found on the link. The default is to disable RA reception for bridge devices or when IP forwarding is enabled, and to enable it
otherwise. Cannot be enabled on bond devices and when link local addressing is disabled.
当IPv6AcceptRA选项为true时(默认为true),如果在收到的RA上有相关标志位,或者链路上没发现有路由器,都会触发DHCPv6客户端。
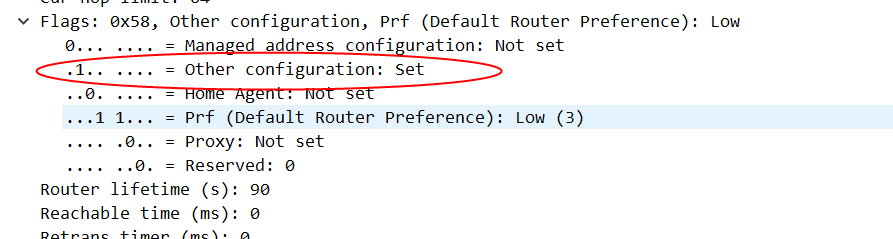
对应我们环境的情形,就是enp0s3收到一个RA报文,这报文里要求从DHCP获取其他信息,也就是设置了O标志位,所以它触发了DHCPv6客户端发起了Information-Requests请求。

我们现在把IPv6的link-local禁用了,实际上这个接口就无法再处理IPv6请求,对我们现在的场景来说,这个是可以接受的,因为enp0s3接口上本身不应该获取到IPv6地址,我们只是通过这个接口发起PPPoE请求,实际的IPv6是在PPPoE接口上分配的。 从下面的结果看,我们发现这个enp0s3目前是没有任何IPv6地址:
2: enp0s3: <BROADCAST,MULTICAST,UP,LOWER_UP> mtu 1500 qdisc fq_codel state UP group default qlen 1000
    link/ether 08:00:x:x:ad:c8 brd ff:ff:ff:ff:ff:ff
    inet 192.168.1.2/24 brd 192.168.1.255 scope global enp0s3
       valid_lft forever preferred_lft forever
如果在某种场景下,我们既需要禁用systemd-networkd的DHCPv6客户端,又需要保持通过RA方式进行SLAAC的能力。这时候netplan就有些力不从心,我们需要通过systemd-networkd的原始配置文件来实现这个功能:
root@hlxd:/etc/systemd/network# cat 10-enp0s3.network
[Match]
Name=enp0s3

[Network]
DNS=223.5.5.5
IPv6AcceptRA=yes
Address=192.168.1.2/24
LinkLocalAddressing=ipv6
[IPv6AcceptRA]
DHCPv6Client=false
root@hlxd:/etc/systemd/network# networkctl reload
root@hlxd:/etc/systemd/network# ss -anp|grep 546
u_str ESTAB  0      0                                                       * 113546                 * 117015 users:(("udisksd",pid=45362,fd=2),("udisksd",pid=45362,fd=1))
u_str ESTAB  0      0                             /run/systemd/journal/stdout 117015                 * 113546 users:(("systemd-journal",pid=31489,fd=21),("systemd",pid=1,fd=112))
root@hlxd:/etc/systemd/network# ip addr
1: lo: <LOOPBACK,UP,LOWER_UP> mtu 65536 qdisc noqueue state UNKNOWN group default qlen 1000
    link/loopback 00:00:00:00:00:00 brd 00:00:00:00:00:00
    inet 127.0.0.1/8 scope host lo
       valid_lft forever preferred_lft forever
    inet6 ::1/128 scope host
       valid_lft forever preferred_lft forever
2: enp0s3: <BROADCAST,MULTICAST,UP,LOWER_UP> mtu 1500 qdisc fq_codel state UP group default qlen 1000
    link/ether 08:00:x:x:ad:c8 brd ff:ff:ff:ff:ff:ff
    inet 192.168.1.2/24 brd 192.168.1.255 scope global enp0s3
       valid_lft forever preferred_lft forever
    inet6 fe80::a00:x:x:adc8/64 scope link
       valid_lft forever preferred_lft forever
启动wide-dhcpv6-client
下面我们可以重新启动下wide-dhcpv6-client服务:
root@hlxd:/etc/systemd/network# systemctl start wide-dhcpv6-client
root@hlxd:/etc/systemd/network# systemctl status wide-dhcpv6-client
● wide-dhcpv6-client.service - LSB: Start/Stop WIDE DHCPv6 client
     Loaded: loaded (/etc/init.d/wide-dhcpv6-client; generated)
     Active: active (running) since WWW YYYY-MM-DD 07:43:34 UTC; 5s ago
       Docs: man:systemd-sysv-generator(8)
    Process: 50007 ExecStart=/etc/init.d/wide-dhcpv6-client start (code=exited, status=0/SUCCESS)
      Tasks: 1 (limit: 4571)
     Memory: 276.0K
        CPU: 14ms
     CGroup: /system.slice/wide-dhcpv6-client.service
             └─50012 /usr/sbin/dhcp6c -Pdefault pppoe_dial

MMM DD 07:43:32 hlxd systemd[1]: Starting LSB: Start/Stop WIDE DHCPv6 client...
MMM DD 07:43:32 hlxd wide-dhcpv6-client[50007]:  * Starting WIDE DHCPv6 client dhcp6c
MMM DD 07:43:34 hlxd systemd[1]: Started LSB: Start/Stop WIDE DHCPv6 client.
root@hlxd:/etc/systemd/network# ss -anp|grep 546
u_str ESTAB     0      0                                                       * 113546                 * 117015 users:(("udisksd",pid=45362,fd=2),("udisksd",pid=45362,fd=1))
u_str ESTAB     0      0                             /run/systemd/journal/stdout 117015                 * 113546 users:(("systemd-journal",pid=31489,fd=21),("systemd",pid=1,fd=70))
udp   UNCONN    0      0                                                    [::]:546                 [::]:*      users:(("dhcp6c",pid=50012,fd=4))

tcp   LISTEN    0      1                                                   [::1]:5546                [::]:*      users:(("dhcp6c",pid=50012,fd=6))
当然这里我们只是启动了这个客户端,并没有做什么具体的配置,因此它不会有什么实际的DHCPv6功能。
配置dhcpv6客户端
基础配置
原始配置文件如下:
root@hlxd:/etc/wide-dhcpv6# cat dhcp6c.conf
# Default dhpc6c configuration: it assumes the address is autoconfigured using
# router advertisements.

profile default
{
  information-only;

  request domain-name-servers;
  request domain-name;

  script "/etc/wide-dhcpv6/dhcp6c-script";
};
修改后如下:
root@hlxd:/etc/wide-dhcpv6# vim dhcp6c.conf
root@hlxd:/etc/wide-dhcpv6# cat dhcp6c.conf
# Default dhpc6c configuration: it assumes the address is autoconfigured using
# router advertisements.

profile default
{
  information-only;

  request domain-name-servers;
  request domain-name;

  script "/etc/wide-dhcpv6/dhcp6c-script";
};

interface pppoe_dial {
        send ia-na 0;
        request domain-name-servers, domain-name;
        send rapid-commit;
        send ia-pd 0;
};

id-assoc na 0 {};

id-assoc pd 0 {
        prefix ::/60 infinity;
        prefix-interface enp0s8 {
                sla-id 1;
                sla-len 4;
                ifid 1;
        };
};
此外,还需要修改/etc/default/wide-dhcpv6-client 文件,设置正确的INTERFACES(从哪个接口获取dhcpv6,一般是pppoe)。
重启服务systemctl restart wide-dhcpv6-client,观察到enp0s8接口已经获取到ip地址:
```bash
3: enp0s8: <BROADCAST,MULTICAST,UP,LOWER_UP> mtu 1500 qdisc fq_codel state UP group default qlen 1000
    link/ether 08:00:x:x:4b:e9 brd ff:ff:ff:ff:ff:ff
    inet 192.168.56.103/24 metric 100 brd 192.168.56.255 scope global dynamic enp0s8
       valid_lft 552sec preferred_lft 552sec
    inet6 240e:x:x:8301::1/64 scope global
       valid_lft forever preferred_lft forever
    inet6 fe80::a00:x:x:4be9/64 scope link
       valid_lft forever preferred_lft forever
sla-len 验证
我们把sla-len 4修改成sla-len 0,重启服务,观察ip地址变化:
id-assoc pd 0 {
        prefix ::/60 infinity;
        prefix-interface enp0s8 {
                sla-id 1;
                sla-len 0;
                ifid 1;
        };
};
3: enp0s8: <BROADCAST,MULTICAST,UP,LOWER_UP> mtu 1500 qdisc fq_codel state UP group default qlen 1000
    link/ether 08:00:x:x:4b:e9 brd ff:ff:ff:ff:ff:ff
    inet 192.168.56.103/24 metric 100 brd 192.168.56.255 scope global dynamic enp0s8
       valid_lft 361sec preferred_lft 361sec
    inet6 240e:x:x:8300::1/60 scope global
       valid_lft forever preferred_lft forever
    inet6 fe80::a00:x:x:4be9/64 scope link
       valid_lft forever preferred_lft forever
可以看到分配的ip地址前缀变成了/60。
EUI-64验证
我们将sla-len恢复成4,删除sla-id,配置如下:
id-assoc pd 0 {
        prefix ::/60 infinity;
        prefix-interface enp0s8 {
                sla-id 1;
                sla-len 4;
        };
};
重启服务,可以观察到分配的IPv6地址变化:
3: enp0s8: <BROADCAST,MULTICAST,UP,LOWER_UP> mtu 1500 qdisc fq_codel state UP group default qlen 1000
    link/ether 08:00:x:x:4b:e9 brd ff:ff:ff:ff:ff:ff
    inet 192.168.56.103/24 metric 100 brd 192.168.56.255 scope global dynamic enp0s8
       valid_lft 529sec preferred_lft 529sec
    inet6 240e:x:x:8301:a00:x:x:4be9/64 scope global
       valid_lft forever preferred_lft forever
    inet6 fe80::a00:x:x:4be9/64 scope link
       valid_lft forever preferred_lft forever
随机地址
增加ifid-random参数:
id-assoc pd 0 {
        prefix ::/60 infinity;
        prefix-interface enp0s8 {
                sla-id 1;
                sla-len 4;
                ifid-random;
        };
};
重启服务,得到如下结果:
3: enp0s8: <BROADCAST,MULTICAST,UP,LOWER_UP> mtu 1500 qdisc fq_codel state UP group default qlen 1000
    link/ether 08:00:x:x:4b:e9 brd ff:ff:ff:ff:ff:ff
    inet 192.168.56.103/24 metric 100 brd 192.168.56.255 scope global dynamic enp0s8
       valid_lft 308sec preferred_lft 308sec
    inet6 240e:x:x:8301:604c:x:x:eea/64 scope global
       valid_lft forever preferred_lft forever
    inet6 fe80::a00:x:x:4be9/64 scope link
       valid_lft forever preferred_lft forever
可以看到分配的IPv6地址不再是1或者和硬件地址相关。
sla-id验证
我们可以将sla-id修改成0-15的任意一个值(实际上不限于这16个值,只不过取其它值会被取模,结果还是0-15)。
id-assoc pd 0 {
        prefix ::/60 infinity;
        prefix-interface enp0s8 {
                sla-id 7;
                sla-len 4;
                ifid-random;
        };
};
重启服务:
3: enp0s8: <BROADCAST,MULTICAST,UP,LOWER_UP> mtu 1500 qdisc fq_codel state UP group default qlen 1000
    link/ether 08:00:x:x:4b:e9 brd ff:ff:ff:ff:ff:ff
    inet 192.168.56.103/24 metric 100 brd 192.168.56.255 scope global dynamic enp0s8
       valid_lft 466sec preferred_lft 466sec
    inet6 240e:x:x:8307:77de:x:x:5b0c/64 scope global
       valid_lft forever preferred_lft forever
    inet6 fe80::a00:x:x:4be9/64 scope link
       valid_lft forever preferred_lft forever
观察到获取的IPv6地址第三个冒号后面的值已经从8301变成8307。
Debug日志分析和Wiresharp解包
四个消息交互debug日志
我们尝试修改prefix的有效时间:
id-assoc pd 0 {
        prefix ::/60  86900 87200;
        prefix-interface enp0s8 {
                sla-id 7;
                sla-len 4;
                ifid-random;
        };
};
结果发现ip地址没有任何变化。为了了解dhcp6c在后台做了什么操作,我们可以通过将/etc/default/wide-dhcpv6-client的VERBOSE调整为2来开启调试模式。
root@hlxd:/etc/wide-dhcpv6# cat /etc/default/wide-dhcpv6-client
# Defaults for dhcpv6 client initscript
# Used by /etc/init.d/wide-dhcpv6-client

# Interfaces on which the client should send DHCPv6 requests and listen to
# answers. If empty, the client is deactivated.
INTERFACES="pppoe_dial"

# Verbose level for syslog. Default is 0 (0: minimal; 1: info; 2: debug)
VERBOSE=2
从syslog我们可以观察到如下日志:
MMM DD 03:11:21 hlxd systemd[1]: Starting LSB: Start/Stop WIDE DHCPv6 client...
MMM DD 03:11:21 hlxd wide-dhcpv6-client[64280]:  * Starting WIDE DHCPv6 client dhcp6c
MMM DD 03:11:21 hlxd dhcp6c[64284]: get_duid: extracted an existing DUID from /var/lib/dhcpv6/dhcp6c_duid: 00:01:00:01:2c:11:5e:98:08:x:x:x:ad:c8
MMM DD 03:11:21 hlxd dhcp6c[64284]: cfdebug_print: <3>comment [# Default dhpc6c configuration: it assumes the address is autoconfigured using] (78)
MMM DD 03:11:21 hlxd dhcp6c[64284]: cfdebug_print: <3>comment [# router advertisements.] (24)
MMM DD 03:11:21 hlxd dhcp6c[64284]: cfdebug_print: <3>[profile] (7)
MMM DD 03:11:21 hlxd dhcp6c[64284]: cfdebug_print: <7>[default] (7)
MMM DD 03:11:21 hlxd dhcp6c[64284]: cfdebug_print: <3>begin of closure [{] (1)
MMM DD 03:11:21 hlxd dhcp6c[64284]: cfdebug_print: <3>[information-only] (16)
MMM DD 03:11:21 hlxd dhcp6c[64284]: cfdebug_print: <3>end of sentence [;] (1)
MMM DD 03:11:21 hlxd dhcp6c[64284]: cfdebug_print: <3>[request] (7)
MMM DD 03:11:21 hlxd dhcp6c[64284]: cfdebug_print: <3>[domain-name-servers] (19)
MMM DD 03:11:21 hlxd dhcp6c[64284]: cfdebug_print: <3>end of sentence [;] (1)
MMM DD 03:11:21 hlxd dhcp6c[64284]: cfdebug_print: <3>[request] (7)
MMM DD 03:11:21 hlxd dhcp6c[64284]: cfdebug_print: <3>[domain-name] (11)
MMM DD 03:11:21 hlxd dhcp6c[64284]: cfdebug_print: <3>end of sentence [;] (1)
MMM DD 03:11:21 hlxd dhcp6c[64284]: cfdebug_print: <3>[script] (6)
MMM DD 03:11:21 hlxd dhcp6c[64284]: cfdebug_print: <3>["/etc/wide-dhcpv6/dhcp6c-script"] (32)
MMM DD 03:11:21 hlxd dhcp6c[64284]: cfdebug_print: <3>end of sentence [;] (1)
MMM DD 03:11:21 hlxd dhcp6c[64284]: cfdebug_print: <3>end of closure [}] (1)
MMM DD 03:11:21 hlxd dhcp6c[64284]: cfdebug_print: <3>end of sentence [;] (1)
MMM DD 03:11:21 hlxd dhcp6c[64284]: cfdebug_print: <3>[interface] (9)
MMM DD 03:11:21 hlxd dhcp6c[64284]: cfdebug_print: <5>[pppoe_dial] (10)
MMM DD 03:11:21 hlxd dhcp6c[64284]: cfdebug_print: <3>begin of closure [{] (1)
MMM DD 03:11:21 hlxd dhcp6c[64284]: cfdebug_print: <3>[send] (4)
MMM DD 03:11:21 hlxd dhcp6c[64284]: cfdebug_print: <3>[ia-na] (5)
MMM DD 03:11:21 hlxd dhcp6c[64284]: cfdebug_print: <3>[0] (1)
MMM DD 03:11:21 hlxd dhcp6c[64284]: cfdebug_print: <3>end of sentence [;] (1)
MMM DD 03:11:21 hlxd dhcp6c[64284]: cfdebug_print: <3>[request] (7)
MMM DD 03:11:21 hlxd dhcp6c[64284]: cfdebug_print: <3>[domain-name-servers] (19)
MMM DD 03:11:21 hlxd dhcp6c[64284]: cfdebug_print: <3>[,] (1)
MMM DD 03:11:21 hlxd dhcp6c[64284]: cfdebug_print: <3>[domain-name] (11)
MMM DD 03:11:21 hlxd dhcp6c[64284]: cfdebug_print: <3>end of sentence [;] (1)
MMM DD 03:11:21 hlxd dhcp6c[64284]: cfdebug_print: <3>[send] (4)
MMM DD 03:11:21 hlxd dhcp6c[64284]: cfdebug_print: <3>[rapid-commit] (12)
MMM DD 03:11:21 hlxd dhcp6c[64284]: cfdebug_print: <3>end of sentence [;] (1)
MMM DD 03:11:21 hlxd dhcp6c[64284]: cfdebug_print: <3>[send] (4)
MMM DD 03:11:21 hlxd dhcp6c[64284]: cfdebug_print: <3>[ia-pd] (5)
MMM DD 03:11:21 hlxd dhcp6c[64284]: cfdebug_print: <3>[0] (1)
MMM DD 03:11:21 hlxd dhcp6c[64284]: cfdebug_print: <3>end of sentence [;] (1)
MMM DD 03:11:21 hlxd dhcp6c[64284]: cfdebug_print: <3>end of closure [}] (1)
MMM DD 03:11:21 hlxd dhcp6c[64284]: cfdebug_print: <3>end of sentence [;] (1)
MMM DD 03:11:21 hlxd dhcp6c[64284]: cfdebug_print: <3>[id-assoc] (8)
MMM DD 03:11:21 hlxd dhcp6c[64284]: cfdebug_print: <15>[na] (2)
MMM DD 03:11:21 hlxd dhcp6c[64284]: cfdebug_print: <15>[0] (1)
MMM DD 03:11:21 hlxd dhcp6c[64284]: cfdebug_print: <15>begin of closure [{] (1)
MMM DD 03:11:21 hlxd dhcp6c[64284]: cfdebug_print: <3>end of closure [}] (1)
MMM DD 03:11:21 hlxd dhcp6c[64284]: cfdebug_print: <3>end of sentence [;] (1)
MMM DD 03:11:21 hlxd dhcp6c[64284]: cfdebug_print: <3>[id-assoc] (8)
MMM DD 03:11:21 hlxd dhcp6c[64284]: cfdebug_print: <15>[pd] (2)
MMM DD 03:11:21 hlxd dhcp6c[64284]: cfdebug_print: <15>[0] (1)
MMM DD 03:11:21 hlxd dhcp6c[64284]: cfdebug_print: <15>begin of closure [{] (1)
MMM DD 03:11:21 hlxd dhcp6c[64284]: cfdebug_print: <3>[prefix] (6)
MMM DD 03:11:21 hlxd dhcp6c[64284]: cfdebug_print: <3>[::] (2)
MMM DD 03:11:21 hlxd dhcp6c[64284]: cfdebug_print: <3>[/] (1)
MMM DD 03:11:21 hlxd dhcp6c[64284]: cfdebug_print: <3>[60] (2)
MMM DD 03:11:21 hlxd dhcp6c[64284]: cfdebug_print: <3>[86900] (5)
MMM DD 03:11:21 hlxd dhcp6c[64284]: cfdebug_print: <3>[87200] (5)
MMM DD 03:11:21 hlxd dhcp6c[64284]: cfdebug_print: <3>end of sentence [;] (1)
MMM DD 03:11:21 hlxd dhcp6c[64284]: cfdebug_print: <3>[prefix-interface] (16)
MMM DD 03:11:21 hlxd dhcp6c[64284]: cfdebug_print: <5>[enp0s8] (6)
MMM DD 03:11:21 hlxd dhcp6c[64284]: cfdebug_print: <3>begin of closure [{] (1)
MMM DD 03:11:21 hlxd dhcp6c[64284]: cfdebug_print: <3>[sla-id] (6)
MMM DD 03:11:21 hlxd dhcp6c[64284]: cfdebug_print: <3>[7] (1)
MMM DD 03:11:21 hlxd dhcp6c[64284]: cfdebug_print: <3>end of sentence [;] (1)
MMM DD 03:11:21 hlxd dhcp6c[64284]: cfdebug_print: <3>[sla-len] (7)
MMM DD 03:11:21 hlxd dhcp6c[64284]: cfdebug_print: <3>[4] (1)
MMM DD 03:11:21 hlxd dhcp6c[64284]: cfdebug_print: <3>end of sentence [;] (1)
MMM DD 03:11:21 hlxd dhcp6c[64284]: cfdebug_print: <3>[ifid-random] (11)
MMM DD 03:11:21 hlxd dhcp6c[64284]: cfdebug_print: <3>end of sentence [;] (1)
MMM DD 03:11:21 hlxd dhcp6c[64284]: cfdebug_print: <3>end of closure [}] (1)
MMM DD 03:11:21 hlxd dhcp6c[64284]: cfdebug_print: <3>end of sentence [;] (1)
MMM DD 03:11:21 hlxd dhcp6c[64284]: cfdebug_print: <3>end of closure [}] (1)
MMM DD 03:11:21 hlxd dhcp6c[64284]: cfdebug_print: <3>end of sentence [;] (1)
MMM DD 03:11:21 hlxd dhcp6c[64284]: configure_pool: called
MMM DD 03:11:21 hlxd dhcp6c[64284]: clear_poolconf: called
MMM DD 03:11:21 hlxd dhcp6c[64285]: dhcp6_reset_timer: reset a timer on pppoe_dial, state=INIT, timeo=0, retrans=441
MMM DD 03:11:21 hlxd dhcp6c[64285]: client6_send: a new XID (9affad) is generated
MMM DD 03:11:21 hlxd dhcp6c[64285]: copy_option: set client ID (len 14)
MMM DD 03:11:21 hlxd dhcp6c[64285]: copyout_option: set identity association
MMM DD 03:11:21 hlxd dhcp6c[64285]: copy_option: set rapid commit (len 0)
MMM DD 03:11:21 hlxd dhcp6c[64285]: copy_option: set elapsed time (len 2)
MMM DD 03:11:21 hlxd dhcp6c[64285]: copy_option: set option request (len 4)
MMM DD 03:11:21 hlxd dhcp6c[64285]: copyout_option: set IA_PD prefix
MMM DD 03:11:21 hlxd dhcp6c[64285]: copyout_option: set IA_PD
MMM DD 03:11:21 hlxd dhcp6c[64285]: client6_send: send solicit to ff02::1:2%pppoe_dial
MMM DD 03:11:21 hlxd dhcp6c[64285]: dhcp6_reset_timer: reset a timer on pppoe_dial, state=SOLICIT, timeo=0, retrans=1021
MMM DD 03:11:21 hlxd dhcp6c[64285]: client6_recv: receive advertise from fe80::8646:x:x:ea97%pppoe_dial on pppoe_dial
MMM DD 03:11:21 hlxd dhcp6c[64285]: dhcp6_get_options: get DHCP option client ID, len 14
MMM DD 03:11:21 hlxd dhcp6c[64285]:   DUID: 00:01:00:01:2c:11:5e:98:08:x:x:x:ad:c8
MMM DD 03:11:21 hlxd dhcp6c[64285]: dhcp6_get_options: get DHCP option server ID, len 14
MMM DD 03:11:21 hlxd dhcp6c[64285]:   DUID: 00:01:00:06:2d:9b:b5:f3:80:x:x:x:2f:88
MMM DD 03:11:21 hlxd dhcp6c[64285]: dhcp6_get_options: get DHCP option preference, len 1
MMM DD 03:11:21 hlxd dhcp6c[64285]:   preference: 255
MMM DD 03:11:21 hlxd dhcp6c[64285]: dhcp6_get_options: get DHCP option identity association, len 30
MMM DD 03:11:21 hlxd dhcp6c[64285]:   IA_NA: ID=0, T1=0, T2=0
MMM DD 03:11:21 hlxd dhcp6c[64285]: copyin_option: get DHCP option status code, len 14
MMM DD 03:11:21 hlxd dhcp6c[64285]:   status code: no addresses
MMM DD 03:11:21 hlxd dhcp6c[64285]: dhcp6_get_options: get DHCP option IA_PD, len 54
MMM DD 03:11:21 hlxd dhcp6c[64285]:   IA_PD: ID=0, T1=86400, T2=138240
MMM DD 03:11:21 hlxd dhcp6c[64285]: copyin_option: get DHCP option IA_PD prefix, len 25
MMM DD 03:11:21 hlxd dhcp6c[64285]: copyin_option:   IA_PD prefix: 240e:x:x:8300::/60 pltime=172800 vltime=259200
MMM DD 03:11:21 hlxd dhcp6c[64285]: copyin_option: get DHCP option status code, len 9
MMM DD 03:11:21 hlxd dhcp6c[64285]:   status code: success
MMM DD 03:11:21 hlxd dhcp6c[64285]: dhcp6_get_options: get DHCP option DNS, len 32
MMM DD 03:11:21 hlxd dhcp6c[64285]: client6_recvadvert: server ID: 00:01:00:06:2d:9b:b5:f3:80:x:x:x:2f:88, pref=255
MMM DD 03:11:21 hlxd dhcp6c[64285]: client6_recvadvert: unexpected advertise
MMM DD 03:11:21 hlxd dhcp6c[64285]: client6_send: a new XID (6a7636) is generated
MMM DD 03:11:21 hlxd dhcp6c[64285]: copy_option: set client ID (len 14)
MMM DD 03:11:21 hlxd dhcp6c[64285]: copy_option: set server ID (len 14)
MMM DD 03:11:21 hlxd dhcp6c[64285]: copyout_option: set status code
MMM DD 03:11:21 hlxd dhcp6c[64285]: copyout_option: set identity association
MMM DD 03:11:21 hlxd dhcp6c[64285]: copy_option: set elapsed time (len 2)
MMM DD 03:11:21 hlxd dhcp6c[64285]: copy_option: set option request (len 4)
MMM DD 03:11:21 hlxd dhcp6c[64285]: copyout_option: set IA_PD prefix
MMM DD 03:11:21 hlxd dhcp6c[64285]: copyout_option: set status code
MMM DD 03:11:21 hlxd dhcp6c[64285]: copyout_option: set IA_PD
MMM DD 03:11:21 hlxd dhcp6c[64285]: client6_send: send request to ff02::1:2%pppoe_dial
MMM DD 03:11:21 hlxd dhcp6c[64285]: dhcp6_reset_timer: reset a timer on pppoe_dial, state=REQUEST, timeo=0, retrans=1038
MMM DD 03:11:21 hlxd dhcp6c[64285]: client6_recv: receive reply from fe80::8646:x:x:ea97%pppoe_dial on pppoe_dial
MMM DD 03:11:21 hlxd dhcp6c[64285]: dhcp6_get_options: get DHCP option client ID, len 14
MMM DD 03:11:21 hlxd dhcp6c[64285]:   DUID: 00:01:00:01:2c:11:5e:98:08:x:x:x:ad:c8
MMM DD 03:11:21 hlxd dhcp6c[64285]: dhcp6_get_options: get DHCP option server ID, len 14
MMM DD 03:11:21 hlxd dhcp6c[64285]:   DUID: 00:01:00:06:2d:9b:b5:f3:80:x:x:x:2f:88
MMM DD 03:11:21 hlxd dhcp6c[64285]: dhcp6_get_options: get DHCP option identity association, len 30
MMM DD 03:11:21 hlxd dhcp6c[64285]:   IA_NA: ID=0, T1=0, T2=0
MMM DD 03:11:21 hlxd dhcp6c[64285]: copyin_option: get DHCP option status code, len 14
MMM DD 03:11:21 hlxd dhcp6c[64285]:   status code: no addresses
MMM DD 03:11:21 hlxd dhcp6c[64285]: dhcp6_get_options: get DHCP option IA_PD, len 54
MMM DD 03:11:21 hlxd dhcp6c[64285]:   IA_PD: ID=0, T1=86400, T2=138240
MMM DD 03:11:21 hlxd dhcp6c[64285]: copyin_option: get DHCP option IA_PD prefix, len 25
MMM DD 03:11:21 hlxd dhcp6c[64285]: copyin_option:   IA_PD prefix: 240e:x:x:8300::/60 pltime=172800 vltime=259200
MMM DD 03:11:21 hlxd dhcp6c[64285]: copyin_option: get DHCP option status code, len 9
MMM DD 03:11:21 hlxd dhcp6c[64285]:   status code: success
MMM DD 03:11:21 hlxd dhcp6c[64285]: dhcp6_get_options: get DHCP option DNS, len 32
MMM DD 03:11:21 hlxd dhcp6c[64285]: info_printf: nameserver[0] 240e:5a::6666
MMM DD 03:11:21 hlxd dhcp6c[64285]: info_printf: nameserver[1] 240e:5b::6666
MMM DD 03:11:21 hlxd dhcp6c[64285]: get_ia: make an IA: PD-0
MMM DD 03:11:21 hlxd dhcp6c[64285]: update_prefix: create a prefix 240e:x:x:8300::/60 pltime=172800, vltime=259200
MMM DD 03:11:21 hlxd dhcp6c[64285]: ifaddrconf: add an address 240e:x:x:8307:3fc3:x:x:a386/64 on enp0s8
MMM DD 03:11:21 hlxd dhcp6c[64285]: update_ia: status code for PD-0: success
MMM DD 03:11:21 hlxd dhcp6c[64285]: get_ia: make an IA: NA-0
MMM DD 03:11:21 hlxd dhcp6c[64285]: update_ia: status code for NA-0: no addresses
MMM DD 03:11:21 hlxd dhcp6c[64285]: update_ia: IA NA-0 is invalidated
MMM DD 03:11:21 hlxd dhcp6c[64285]: remove_ia: remove an IA: NA-0
MMM DD 03:11:21 hlxd dhcp6c[64285]: dhcp6_reset_timer: reset a timer on pppoe_dial, state=INIT, timeo=0, retrans=134
MMM DD 03:11:21 hlxd dhcp6c[64285]: dhcp6_remove_event: removing an event on pppoe_dial, state=REQUEST
MMM DD 03:11:21 hlxd dhcp6c[64285]: dhcp6_remove_event: removing server (ID: 00:01:00:06:2d:9b:b5:f3:80:x:x:x:2f:88)
MMM DD 03:11:21 hlxd dhcp6c[64285]: client6_recvreply: got an expected reply, sleeping.
MMM DD 03:11:21 hlxd dhcp6c[64285]: client6_send: a new XID (1bb530) is generated
MMM DD 03:11:21 hlxd dhcp6c[64285]: copy_option: set client ID (len 14)
MMM DD 03:11:21 hlxd dhcp6c[64285]: copyout_option: set identity association
MMM DD 03:11:21 hlxd dhcp6c[64285]: copy_option: set rapid commit (len 0)
MMM DD 03:11:21 hlxd dhcp6c[64285]: copy_option: set elapsed time (len 2)
MMM DD 03:11:21 hlxd dhcp6c[64285]: copy_option: set option request (len 4)
MMM DD 03:11:21 hlxd dhcp6c[64285]: client6_send: send solicit to ff02::1:2%pppoe_dial
MMM DD 03:11:21 hlxd dhcp6c[64285]: dhcp6_reset_timer: reset a timer on pppoe_dial, state=SOLICIT, timeo=0, retrans=1044
MMM DD 03:11:22 hlxd dhcp6c[64285]: copy_option: set client ID (len 14)
MMM DD 03:11:22 hlxd dhcp6c[64285]: copyout_option: set identity association
MMM DD 03:11:22 hlxd dhcp6c[64285]: copy_option: set rapid commit (len 0)
MMM DD 03:11:22 hlxd dhcp6c[64285]: copy_option: set elapsed time (len 2)
MMM DD 03:11:22 hlxd dhcp6c[64285]: copy_option: set option request (len 4)
MMM DD 03:11:22 hlxd dhcp6c[64285]: client6_send: send solicit to ff02::1:2%pppoe_dial
MMM DD 03:11:22 hlxd dhcp6c[64285]: dhcp6_reset_timer: reset a timer on pppoe_dial, state=SOLICIT, timeo=1, retrans=2126
MMM DD 03:11:23 hlxd wide-dhcpv6-client[64280]:    ...done.
MMM DD 03:11:23 hlxd systemd[1]: Started LSB: Start/Stop WIDE DHCPv6 client.
MMM DD 03:11:24 hlxd dhcp6c[64285]: copy_option: set client ID (len 14)
MMM DD 03:11:24 hlxd dhcp6c[64285]: copyout_option: set identity association
MMM DD 03:11:24 hlxd dhcp6c[64285]: copy_option: set rapid commit (len 0)
MMM DD 03:11:24 hlxd dhcp6c[64285]: copy_option: set elapsed time (len 2)
MMM DD 03:11:24 hlxd dhcp6c[64285]: copy_option: set option request (len 4)
MMM DD 03:11:24 hlxd dhcp6c[64285]: client6_send: send solicit to ff02::1:2%pppoe_dial
MMM DD 03:11:24 hlxd dhcp6c[64285]: dhcp6_reset_timer: reset a timer on pppoe_dial, state=SOLICIT, timeo=2, retrans=4067
MMM DD 03:11:28 hlxd dhcp6c[64285]: copy_option: set client ID (len 14)
MMM DD 03:11:28 hlxd dhcp6c[64285]: copyout_option: set identity association
MMM DD 03:11:28 hlxd dhcp6c[64285]: copy_option: set rapid commit (len 0)
MMM DD 03:11:28 hlxd dhcp6c[64285]: copy_option: set elapsed time (len 2)
MMM DD 03:11:28 hlxd dhcp6c[64285]: copy_option: set option request (len 4)
MMM DD 03:11:28 hlxd dhcp6c[64285]: client6_send: send solicit to ff02::1:2%pppoe_dial
MMM DD 03:11:28 hlxd dhcp6c[64285]: dhcp6_reset_timer: reset a timer on pppoe_dial, state=SOLICIT, timeo=3, retrans=8448
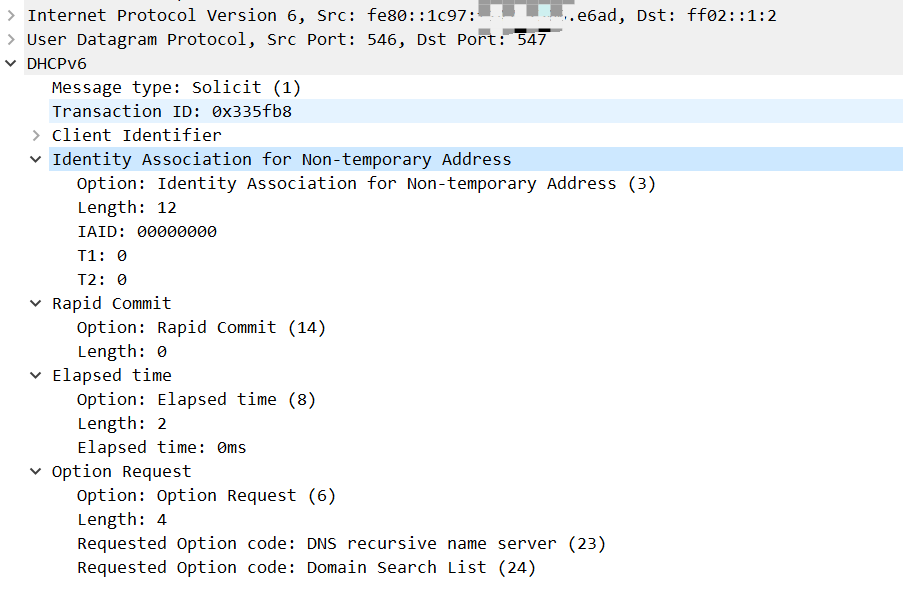
日志中有如下信息:
MMM DD 03:11:21 hlxd dhcp6c[64285]: client6_send: send solicit to ff02::1:2%pppoe_dial
MMM DD 03:11:21 hlxd dhcp6c[64285]: client6_recv: receive advertise from fe80::8646:x:x:ea97%pppoe_dial on pppoe_dial
MMM DD 03:11:21 hlxd dhcp6c[64285]: client6_send: send request to ff02::1:2%pppoe_dial
MMM DD 03:11:21 hlxd dhcp6c[64285]: client6_recv: receive reply from fe80::8646:x:x:ea97%pppoe_dial on pppoe_dial
MMM DD 03:11:21 hlxd dhcp6c[64285]: client6_send: send solicit to ff02::1:2%pppoe_dial
MMM DD 03:11:22 hlxd dhcp6c[64285]: client6_send: send solicit to ff02::1:2%pppoe_dial
MMM DD 03:11:24 hlxd dhcp6c[64285]: client6_send: send solicit to ff02::1:2%pppoe_dial
MMM DD 03:11:28 hlxd dhcp6c[64285]: client6_send: send solicit to ff02::1:2%pppoe_dial
可以看到这是一个四个消息交互过程,客户端发送了rapid commit标志,但是服务端并没有响应rapid commit,因此无法通过两个消息完成交互。
底层抓包
从底层tcpdump包也可以印证这个过程:

Solict包:
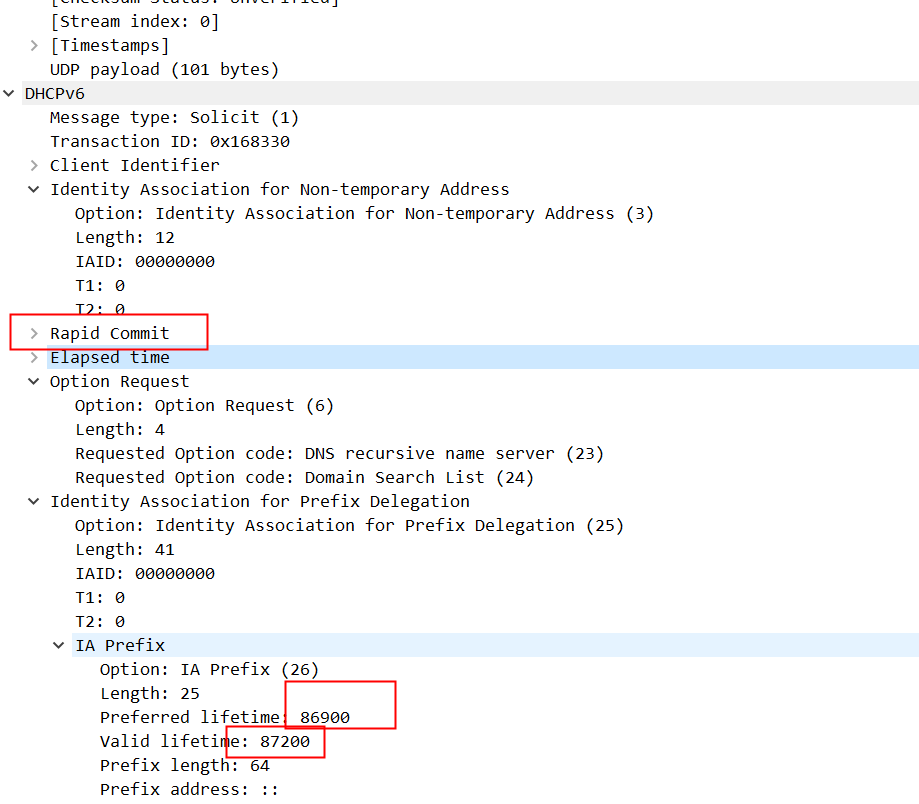
Advertise包:
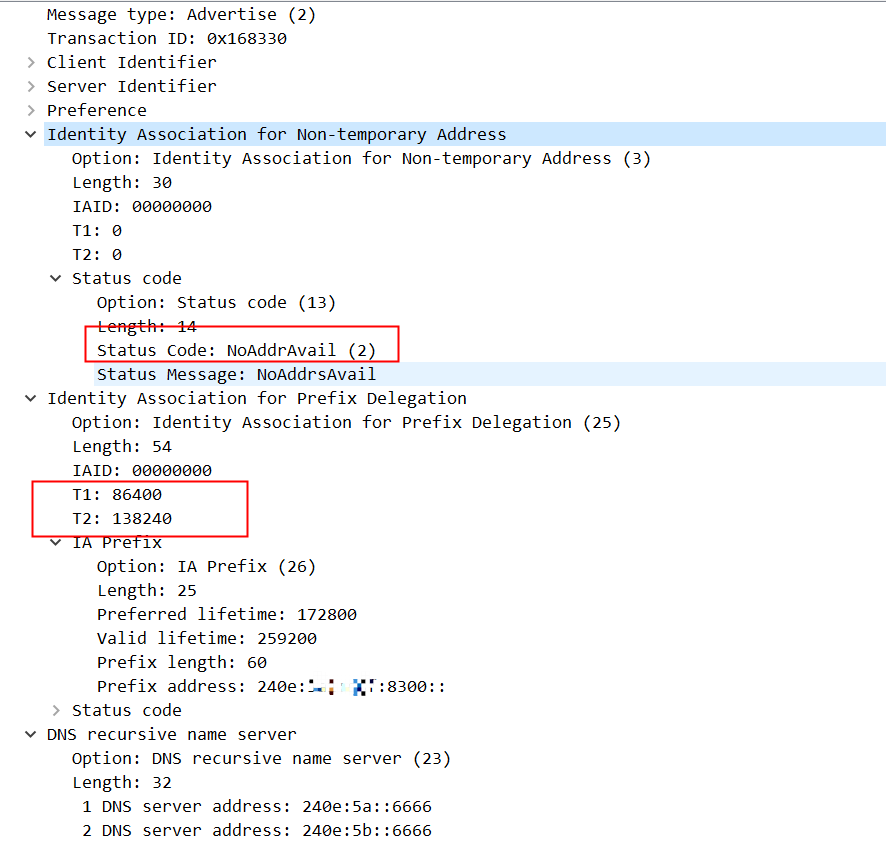
这里需要关注的是na部分,na返回的是地址不可用,因此我们看到在这四个包交互完成后,dhcp6c还在间断性地发Solict包,试图获取到na。我们在接口上看到的ip地址实际上是dhcpv6客户端从pd中自行分配的。
PD部分有两个参数,T1和T2:T1是服务器要求客户端在86400秒后发送RENEW消息,对PD进行租约更新;T2是在服务端要求客户端在138240秒后发送REBIND请求。T2的值大于T1,如果T1时刻RENEW成功了,这两个计时器又会被重置,也就不需要REBIND了。
另外我们还注意到,实际上dhcpv6下发的PD是有首选和有效生命周期的,这两个值分别是172800和259200,这个值不是我们指定通过Solicit发给服务端的86900 和87200,我们在接口上观察的valid_lft forever preferred_lft forever也是虚假的。
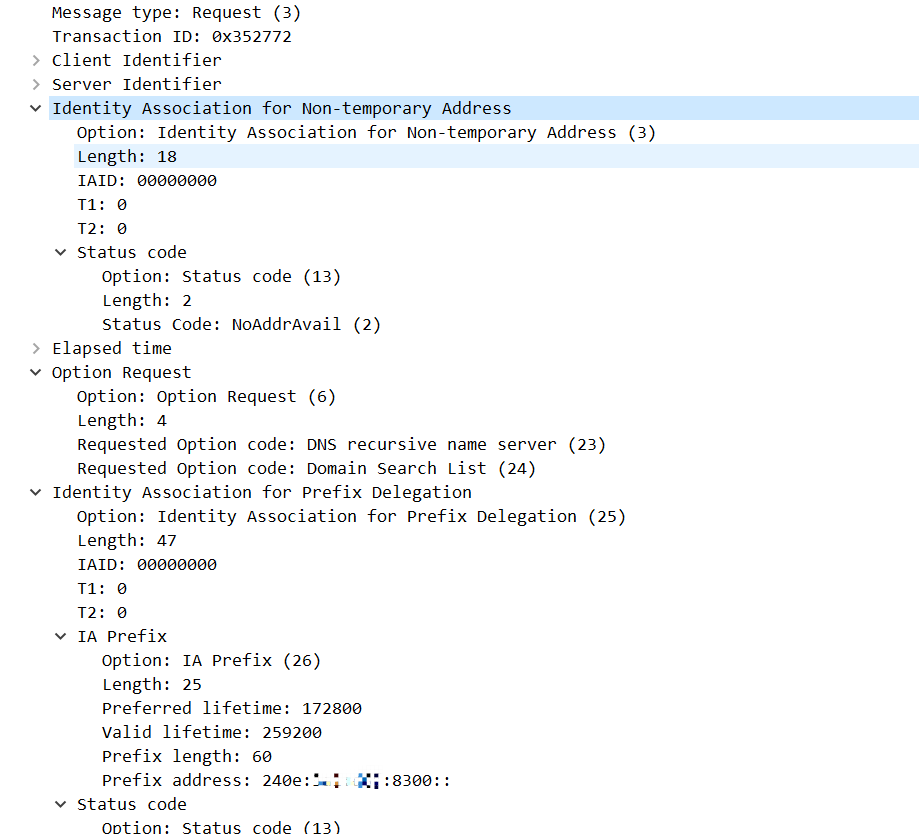
Request 包体如下:
还有Reply的包:
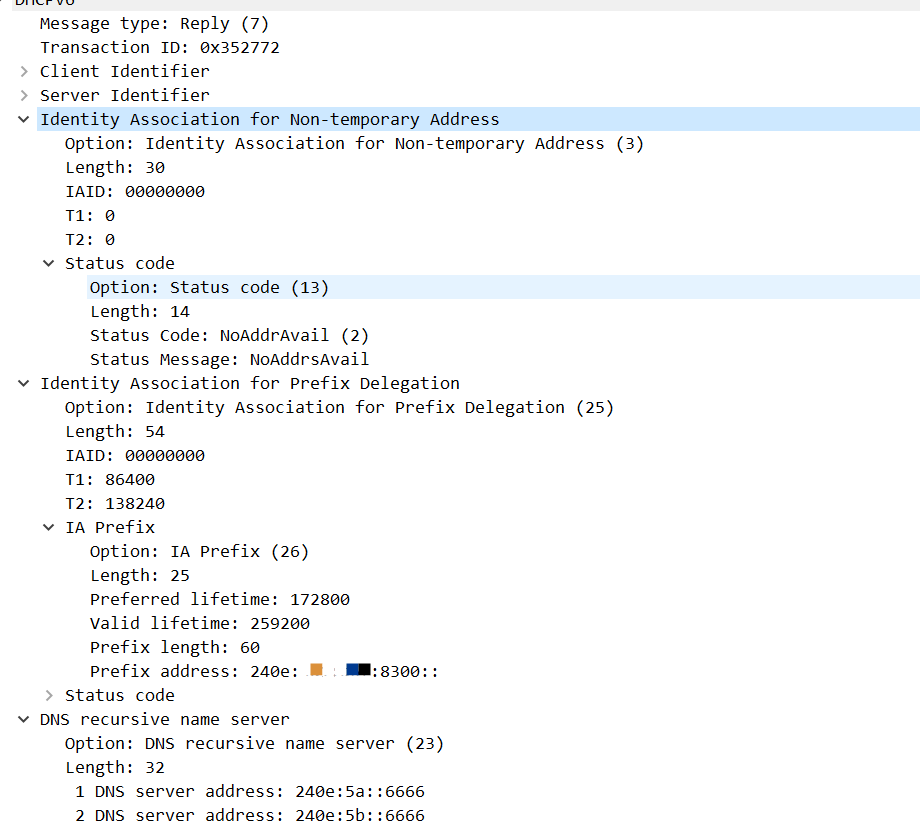
由于NA中没有记录,导致后续继续生成Solicit包,这个包没有收到应答:
这里还有一点值得提一下,虽然我们配置的ia-na没有从服务端获取到IP,但是这个配置是不可缺少的,如果不配ia-na,服务端不会下发PD。这和运营商的BRAS(broadband remote access server)上的DHCPv6服务端实现方式有关,有些运营商可能就不要求这个ia-na,这可能也是为什么网络上有些文章在介绍EdgeRouter配置IPv6时,启用了pd下面的prefix-only,这个选项启动,就相当于此处不发送ia-na。
renew交互
wide-dhcpv6-client内部维护了定时器,我们可以在拨号成功一天后,观察到如下RENEW日志:
MMM DD  03:11:21 hlxd dhcp6c[64285]: dhcp6_reset_timer: reset a timer on pppoe_dial, state=RENEW, timeo=0, retrans=10501
MMM DD  03:11:21 hlxd dhcp6c[64285]: client6_send: a new XID (992f9d) is generated
MMM DD  03:11:21 hlxd dhcp6c[64285]: copy_option: set client ID (len 14)
MMM DD  03:11:21 hlxd dhcp6c[64285]: copy_option: set server ID (len 14)
MMM DD  03:11:21 hlxd dhcp6c[64285]: copy_option: set elapsed time (len 2)
MMM DD  03:11:21 hlxd dhcp6c[64285]: copy_option: set option request (len 4)
MMM DD  03:11:21 hlxd dhcp6c[64285]: copyout_option: set IA_PD prefix
MMM DD  03:11:21 hlxd dhcp6c[64285]: copyout_option: set IA_PD
MMM DD  03:11:21 hlxd dhcp6c[64285]: client6_send: send renew to ff02::1:2%pppoe_dial
MMM DD  03:11:21 hlxd dhcp6c[64285]: client6_recv: receive reply from fe80::8646:x:x:ea97%pppoe_dial on pppoe_dial
MMM DD  03:11:21 hlxd dhcp6c[64285]: dhcp6_get_options: get DHCP option client ID, len 14
MMM DD  03:11:21 hlxd dhcp6c[64285]:   DUID: 00:01:00:01:2c:11:5e:98:x:x:x:x:ad:c8
MMM DD  03:11:21 hlxd dhcp6c[64285]: dhcp6_get_options: get DHCP option server ID, len 14
MMM DD  03:11:21 hlxd dhcp6c[64285]:   DUID: 00:01:00:06:2d:9b:b5:f3:x:x:x:x:2f:88
MMM DD  03:11:21 hlxd dhcp6c[64285]: dhcp6_get_options: get DHCP option identity association, len 30
MMM DD  03:11:21 hlxd dhcp6c[64285]:   IA_NA: ID=0, T1=0, T2=0
MMM DD  03:11:21 hlxd dhcp6c[64285]: copyin_option: get DHCP option status code, len 14
MMM DD  03:11:21 hlxd dhcp6c[64285]:   status code: no addresses
MMM DD  03:11:21 hlxd dhcp6c[64285]: dhcp6_get_options: get DHCP option IA_PD, len 54
MMM DD  03:11:21 hlxd dhcp6c[64285]:   IA_PD: ID=0, T1=86400, T2=138240
MMM DD  03:11:21 hlxd dhcp6c[64285]: copyin_option: get DHCP option IA_PD prefix, len 25
MMM DD  03:11:21 hlxd dhcp6c[64285]: copyin_option:   IA_PD prefix: 240e:x:x:8300::/60 pltime=172800 vltime=259200
MMM DD  03:11:21 hlxd dhcp6c[64285]: copyin_option: get DHCP option status code, len 9
MMM DD  03:11:21 hlxd dhcp6c[64285]:   status code: success
MMM DD  03:11:21 hlxd dhcp6c[64285]: dhcp6_get_options: get DHCP option DNS, len 32
MMM DD  03:11:21 hlxd dhcp6c[64285]: info_printf: nameserver[0] 240e:5a::6666
MMM DD  03:11:21 hlxd dhcp6c[64285]: info_printf: nameserver[1] 240e:5b::6666
MMM DD  03:11:21 hlxd dhcp6c[64285]: get_ia: update an IA: PD-0
MMM DD  03:11:21 hlxd dhcp6c[64285]: update_prefix: update a prefix 240e:3a1:d6f:8300::/60 pltime=172800, vltime=259200
MMM DD  03:11:21 hlxd dhcp6c[64285]: update_ia: status code for PD-0: success
MMM DD  03:11:21 hlxd dhcp6c[64285]: get_ia: make an IA: NA-0
MMM DD  03:11:21 hlxd dhcp6c[64285]: update_ia: status code for NA-0: no addresses
MMM DD  03:11:21 hlxd dhcp6c[64285]: update_ia: IA NA-0 is invalidated
MMM DD  03:11:21 hlxd dhcp6c[64285]: remove_ia: remove an IA: NA-0
MMM DD  03:11:21 hlxd dhcp6c[64285]: dhcp6_reset_timer: reset a timer on pppoe_dial, state=INIT, timeo=0, retrans=248
MMM DD  03:11:21 hlxd dhcp6c[64285]: dhcp6_remove_event: removing an event on pppoe_dial, state=RENEW
MMM DD  03:11:21 hlxd dhcp6c[64285]: client6_recvreply: got an expected reply, sleeping.
RADVD配置
我们现在只是完成了U-Router服务端IPv6配置和PD申请,作为客户端的A-Node机器的enp0s8还不能自动获取IPv6地址:
[root@h48 ~]# ip addr
1: lo: <LOOPBACK,UP,LOWER_UP> mtu 65536 qdisc noqueue state UNKNOWN group default qlen 1000
    link/loopback 00:00:00:00:00:00 brd 00:00:00:00:00:00
    inet 127.0.0.1/8 scope host lo
       valid_lft forever preferred_lft forever
    inet6 ::1/128 scope host
       valid_lft forever preferred_lft forever
2: enp0s3: <BROADCAST,MULTICAST,UP,LOWER_UP> mtu 1500 qdisc fq_codel state UP group default qlen 1000
    link/ether 08:00:x:x:a2:40 brd ff:ff:ff:ff:ff:ff
    inet 192.168.1.3/24 brd 192.168.1.255 scope global dynamic noprefixroute enp0s3
       valid_lft 553937113sec preferred_lft 553937113sec
    inet6 fe80::a00:x:x:a240/64 scope link noprefixroute
       valid_lft forever preferred_lft forever
3: enp0s8: <BROADCAST,MULTICAST,UP,LOWER_UP> mtu 1500 qdisc fq_codel state UP group default qlen 1000
    link/ether 08:00:x:x:23:cf brd ff:ff:ff:ff:ff:ff
    inet 192.168.56.107/24 brd 192.168.56.255 scope global dynamic noprefixroute enp0s8
       valid_lft 432sec preferred_lft 432sec
    inet6 fe80::1b2d:x:x:2477/64 scope link noprefixroute
       valid_lft forever preferred_lft forever
我们需要在U-Router上启动一个radvd来下发RA通告。
安装radvd软件包
我们可以通过apt直接安装:
root@hlxd:~# apt install radvd
Reading package lists... Done
Building dependency tree... Done
Reading state information... Done
The following NEW packages will be installed:
  radvd
0 upgraded, 1 newly installed, 0 to remove and 0 not upgraded.
Need to get 60.3 kB of archives.
After this operation, 157 kB of additional disk space will be used.
Get:1 http://cn.archive.ubuntu.com/ubuntu jammy/main amd64 radvd amd64 1:2.18-3build2 [60.3 kB]
Fetched 60.3 kB in 1s (65.4 kB/s)
Selecting previously unselected package radvd.
(Reading database ... 125331 files and directories currently installed.)
Preparing to unpack .../radvd_1%3a2.18-3build2_amd64.deb ...
Unpacking radvd (1:2.18-3build2) ...
Setting up radvd (1:2.18-3build2) ...
Created symlink /etc/systemd/system/multi-user.target.wants/radvd.service → /lib/systemd/system/radvd.service.
Processing triggers for man-db (2.10.2-1) ...
Scanning processes...
Scanning candidates...
Scanning linux images...

Running kernel seems to be up-to-date.

Restarting services...
Service restarts being deferred:
 /etc/needrestart/restart.d/dbus.service
 systemctl restart networkd-dispatcher.service
 systemctl restart systemd-logind.service
 systemctl restart unattended-upgrades.service
 systemctl restart [email protected]

No containers need to be restarted.

No user sessions are running outdated binaries.

No VM guests are running outdated hypervisor (qemu) binaries on this host.
服务配置
检查服务:
root@hlxd:/usr# systemctl status radvd
○ radvd.service - Router advertisement daemon for IPv6
     Loaded: loaded (/lib/systemd/system/radvd.service; enabled; vendor preset: enabled)
     Active: inactive (dead)
  Condition: start condition failed at WWW YYYY-MM-DD 03:25:47 UTC; 2h 6min ago
             └─ ConditionPathExists=/etc/radvd.conf was not met
       Docs: man:radvd(8)

MMM DD 03:25:47 hlxd systemd[1]: Condition check resulted in Router advertisement daemon for IPv6 being skipped.
发现服务启动失败,我们从/lib/systemd/system/radvd.service文件可以确认radvd的配置文件在/etc/radvd.conf.
root@hlxd:/usr# head /lib/systemd/system/radvd.service
# It's not recommended to modify this file in-place, because it
# will be overwritten during upgrades.  If you want to customize,
# the best way is to use the "systemctl edit" command.

[Unit]
Description=Router advertisement daemon for IPv6
Documentation=man:radvd(8)
After=network.target
ConditionPathExists=/etc/radvd.conf
目前还没有这个文件:
root@hlxd:/usr# ls -ltr /etc/radvd.conf
ls: cannot access '/etc/radvd.conf': No such file or directory
我们可以从示例文件中拷贝一个过来 cp ./share/doc/radvd/examples/radvd.conf.example /etc/radvd.conf,默认内容如下:
root@hlxd:/usr# cat /etc/radvd.conf
#
# NOTE NOTE NOTE NOTE NOTE NOTE NOTE NOTE NOTE NOTE NOTE NOTE NOTE NOTE
# NOTE                                                             NOTE
# NOTE  This is an EXAMPLE, which serves only to demonstrate the   NOTE
# NOTE  syntax of radvd.conf, and is not meant to be used for a    NOTE
# NOTE  real radvd configuration.                                  NOTE
# NOTE                                                             NOTE
# NOTE NOTE NOTE NOTE NOTE NOTE NOTE NOTE NOTE NOTE NOTE NOTE NOTE NOTE
#

interface lo
{
        AdvSendAdvert on;

# This may be needed on some interfaces which are not active when
# radvd starts, but become available later on; see man page for details.

        # IgnoreIfMissing on;

#
# These settings cause advertisements to be sent every 3-10 seconds.  This
# range is good for 6to4 with a dynamic IPv4 address, but can be greatly
# increased when not using 6to4 prefixes.
#

        MinRtrAdvInterval 3;
        MaxRtrAdvInterval 10;

#
# You can use AdvDefaultPreference setting to advertise the preference of
# the router for the purposes of default router determination.
# NOTE: This feature is still being specified and is not widely supported!
#
        AdvDefaultPreference low;

#
# Disable Mobile IPv6 support
#
        AdvHomeAgentFlag off;

#
# example of a standard prefix
#
        prefix 2001:db8:1:0::/64
        {
                AdvOnLink on;
                AdvAutonomous on;
                AdvRouterAddr off;
        };

#
# example of a 6to4 prefix
#
# Note that the first 48 bits are specified here as zeros.  These will be
# replaced with the appropriate 6to4 address when radvd starts or is
# reconfigured. Be sure that the SLA ID (1234 in this case) is specified
# here!
#
        prefix 0:0:0:1234::/64
        {
                AdvOnLink on;
                AdvAutonomous on;
                AdvRouterAddr off;

#
# This setting causes radvd to replace the first 48 bits of the prefix
# with the 6to4 address generated from the specified interface.  For example,
# if the address of ppp0 is 192.0.2.25 when radvd configures itself, this
# prefix will be advertised as 2002:C000:0219:1234::/64.
#
# If ppp0 is not available at configuration time, this prefix will not be
# advertised, but other prefixes listed in the configuration will be
# advertised as usual.
#
# When using the Base6to4Interface option, make sure radvd receives a
# SIGHUP every time the ppp0 interface goes up, down, or is assigned a
# new IPv4 address.  The SIGHUP will cause radvd to recognize that the
# ppp0 interface has changed and will adjust the advertisements
# accordingly.
#

                Base6to4Interface ppp0;

#
# If the IP address of ppp0 is assigned dynamically, be sure to set the
# lifetimes for this prefix to be small.  Otherwise, hosts on your network
# may continue to use a prefix that no longer corresponds to the address
# on ppp0!
#
                AdvPreferredLifetime 120;
                AdvValidLifetime 300;
        };
#
# example of a more specific route
# NOTE: This feature is not very widely supported! You may also need to
# enable it manually (e.g. on Linux, change the value of
# sysctl accept_ra_rt_info_max_plen to 48 or 64)
#
        route 2001:db0:fff::/48
        {
                AdvRoutePreference high;
                AdvRouteLifetime 3600;
        };

#
# RDNSS
# NOTE: This feature is not very widely implemented.
#
        RDNSS 2001:db8::1 2001:db8::2
        {
                AdvRDNSSLifetime 30;
        };

#
# DNS Search Lists
#
        DNSSL branch.example.com example.com
        {
                AdvDNSSLLifetime 30;
        };


};
做一番裁剪:
root@hlxd:/etc# cat radvd.conf
interface enp0s8
{
        AdvSendAdvert on;

        MinRtrAdvInterval 3;
        MaxRtrAdvInterval 10;
        AdvDefaultPreference low;
        AdvHomeAgentFlag off;

        prefix ::/64
        {
                AdvOnLink on;
                AdvAutonomous on;
                AdvRouterAddr off;
        };

};
重启服务:
root@hlxd:/etc# systemctl restart radvd
root@hlxd:/etc# systemctl status radvd
● radvd.service - Router advertisement daemon for IPv6
     Loaded: loaded (/lib/systemd/system/radvd.service; enabled; vendor preset: enabled)
     Active: active (running) since WWW YYYY-MM-DD 05:40:38 UTC; 6s ago
       Docs: man:radvd(8)
    Process: 71777 ExecStartPre=/usr/sbin/radvd --logmethod stderr_clean --configtest (code=exited, status=0/SUCCESS)
    Process: 71778 ExecStart=/usr/sbin/radvd --logmethod stderr_clean (code=exited, status=0/SUCCESS)
   Main PID: 71779 (radvd)
      Tasks: 2 (limit: 4571)
     Memory: 480.0K
        CPU: 32ms
     CGroup: /system.slice/radvd.service
             ├─71779 /usr/sbin/radvd --logmethod stderr_clean
             └─71780 /usr/sbin/radvd --logmethod stderr_clean

MMM DD 05:40:38 hlxd systemd[1]: Starting Router advertisement daemon for IPv6...
MMM DD 05:40:38 hlxd radvd[71777]: config file, /etc/radvd.conf, syntax ok
MMM DD 05:40:38 hlxd radvd[71778]: version 2.18 started
MMM DD 05:40:38 hlxd radvd[71778]: IPv6 forwarding setting is: 0, should be 1 or 2
MMM DD 05:40:38 hlxd radvd[71778]: IPv6 forwarding seems to be disabled, but continuing anyway
MMM DD 05:40:38 hlxd systemd[1]: Started Router advertisement daemon for IPv6.
可以看到服务已经正常启动。
客户端验证
IPv6自动配置
我们再观察作为客户端A-Node的虚机网卡:
3: enp0s8: <BROADCAST,MULTICAST,UP,LOWER_UP> mtu 1500 qdisc fq_codel state UP group default qlen 1000
    link/ether 08:00:x:x:23:cf brd ff:ff:ff:ff:ff:ff
    inet 192.168.56.107/24 brd 192.168.56.255 scope global dynamic noprefixroute enp0s8
       valid_lft 595sec preferred_lft 595sec
    inet6 240e:x:x:8307:x:x:bbf6:f78/64 scope global dynamic noprefixroute
       valid_lft 86395sec preferred_lft 14395sec
    inet6 fe80::1b2d:x:x:2477/64 scope link noprefixroute
       valid_lft forever preferred_lft forever
[root@h48 ~]#
已经自动完成IPv6地址的配置。
DNS服务配置
这时候A-Node的网络还是不可用,域名无法解析:
[root@h48 ~]# ping6 test.ipw.cn
^C
[root@h48 ~]# cat /etc/resolv.conf
# Generated by NetworkManager
nameserver 192.168.1.1
nameserver fe80::1%enp0s3
我们返回U-Router,增加DNS下发配置,并重启服务:
root@hlxd:/etc# vim radvd.conf
root@hlxd:/etc# cat radvd.conf
interface enp0s8
{
        AdvSendAdvert on;

        MinRtrAdvInterval 3;
        MaxRtrAdvInterval 10;
        AdvDefaultPreference low;
        AdvHomeAgentFlag off;

        prefix ::/64
        {
                AdvOnLink on;
                AdvAutonomous on;
                AdvRouterAddr off;
        };

        RDNSS 240e:5a::6666 240e:5b::6666
        {
                AdvRDNSSLifetime 30;
        };
};
root@hlxd:/etc# systemctl restart radvd
这时U-Node上已经获取到DNS配置,但是U-Node无法ping通DNS主机
[root@h48 ~]# cat /etc/resolv.conf
# Generated by NetworkManager
nameserver 192.168.1.1
nameserver fe80::1%enp0s3
nameserver 240e:5a::6666
# NOTE: the libc resolver may not support more than 3 nameservers.
# The nameservers listed below may not be recognized.
nameserver 240e:5b::6666
[root@h48 ~]# ping6 240e:5a::6666
PING 240e:5a::6666(240e:5a::6666) 56 data bytes
^C
--- 240e:5a::6666 ping statistics ---
75 packets transmitted, 0 received, 100% packet loss, time 75802ms
路由配置
我们重新检查下radvd的日志,发现有如下提示:
MMM DD 05:40:38 hlxd radvd[71778]: IPv6 forwarding setting is: 0, should be 1 or 2
U-Router没有开启IPv6 forwarding,这个是作为路由器的基本要求,因此我们需要在U-Router的sysctl.conf增加net.ipv6.conf.all.forwarding = 1配置,并通过sysctl -p生效:
root@hlxd:/etc# sysctl -p
net.ipv6.conf.all.forwarding = 1
root@hlxd:/etc#
生效后我们发现DNS服务器还是ping不通,同时我们发现,U-Router上同样也ping不通这个DNS服务器,进一步通过ip -6 route show检查发现到BRAS端的默认IPv6网关已经丢失。
尝试重启下PPPoE服务器,这时U-Router已经无法获取到IPv6地址。
我们在前一篇edgerouter配置中提到PPPoE拨号的大致流程:
服务端首先会向客户端发起一个PPP IPv6CP的请求,里面携带服务端的接口ID;客户端也会向服务端发起一个一个PPP IPv6CP的请求,里面携带客户端的接口ID;双方都会就对方的IPv6CP请求响应一个ACK消息。客户端根据自己的接口ID结合FE80前缀给自己设置link-local IP。 服务端会通过自己的link-local IP发送一个Router Advertisement组播消息,客户端根据这个消息完成IPv6的自动配置。
根据这个流程PPPoE接口上的IPv6地址实际上是通过SLAAC获取的,这里涉及到一个系统参数间冲突的问题。Linux认为系统一旦配置了forwarding,就是一个IPv6路由器,而不是IPv6节点,而IPv6路由器默认是不用接收其他路由器的通告,因此它会拒绝RA。Linux内核提供net.ipv6.conf.pppoe_dial.accept_ra参数,这个参数当前值是1,在没有启用forwarding之前这个值是合适的。一旦forwarding参数设置了,我们需要相应地将这个参数改成2,忽视forwarding配置接受RA。 因此我们可以增加如下文件:
root@hlxd:/etc/ppp/ipv6-up.d# cat local
#!/bin/sh
# need to disable forwarding to receive RAs
sysctl -w net.ipv6.conf.$PPP_IFACE.accept_ra=2
root@hlxd:/etc/ppp/ipv6-up.d# chmod +x local
这样在拨号成功后,可以自动将accept_ra改成2。这里可能还有一个潜在的问题,就是假如BRAS端发送RA的时间比我们执行/etc/ppp/ipv6-up.d/local的时间早那么一点点,那么我们的还是无法分配到IPv6地址,只能等待BRAS下个周期发的RA。
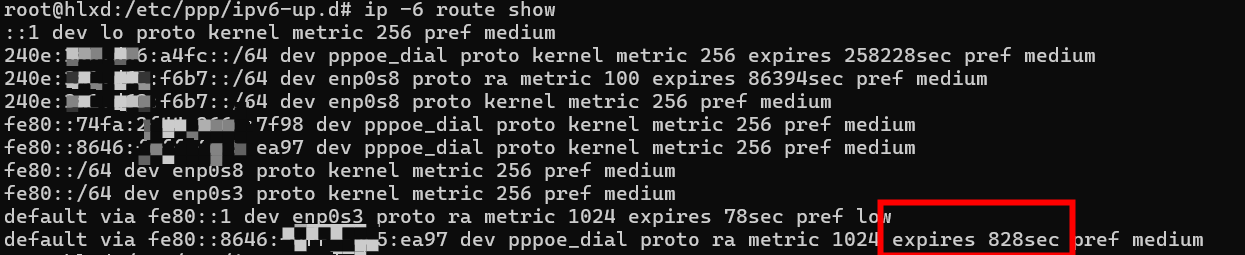
U-Router之前已经获取到IPv6地址,在设置了forwarding之后,默认路由为什么会丢失?这是因为现在通过路由器通告获取的默认路由,都是有时效性的,过期了就自动删除,需要通过RA来更新:
U-Router重启pppoe拨号服务,并相应重启wide-dhcpv6-client和radvd服务。 A-Node机器更新接口ip:
[root@h48 ~]# nmcli c up "Wired connection 1"
Connection successfully activated (D-Bus active path: /org/freedesktop/NetworkManager/ActiveConnection/3)
这时,A-Node上已经可以ping通dns服务器:
[root@h48 ~]# ping6 240e:5a::6666
PING 240e:5a::6666(240e:5a::6666) 56 data bytes
64 bytes from 240e:5a::6666: icmp_seq=1 ttl=60 time=4.55 ms
64 bytes from 240e:5a::6666: icmp_seq=2 ttl=60 time=4.14 ms
64 bytes from 240e:5a::6666: icmp_seq=3 ttl=60 time=3.76 ms
MTU黑洞
检查IPv6联通性,发现网站访问缓慢,估计是解析问题,域名先到192.168.1.1解析,再转到IPv6的DNS服务器:
[root@h48 ~]# curl -v https://test.ipw.cn/
*   Trying 240e:e9:900e:22:3e::12...
* TCP_NODELAY set
* Connected to test.ipw.cn (240e:e9:900e:22:3e::12) port 443 (#0)
* ALPN, offering h2
* ALPN, offering http/1.1
* successfully set certificate verify locations:
*   CAfile: /etc/pki/tls/certs/ca-bundle.crt
  CApath: none
* TLSv1.3 (OUT), TLS handshake, Client hello (1):
^C
[root@h48 ~]#
我们对enps0s3做一番调整,禁用PeerDNS,禁用ipv6 autoconf,重启NetworkManager,DNS解析就比较清爽了:
[root@h48 ~]# cat /etc/sysconfig/network-scripts/ifcfg-enp0s3
TYPE=Ethernet
PROXY_METHOD=none
BROWSER_ONLY=no
BOOTPROTO=dhcp
DEFROUTE=yes
IPV4_FAILURE_FATAL=no
IPV6INIT=no
IPV6_AUTOCONF=no
IPV6_DEFROUTE=yes
IPV6_FAILURE_FATAL=no
NAME=enp0s3
UUID=ef881eb5-a093-4be1-ab4f-87ce7aea381c
DEVICE=enp0s3
ONBOOT=yes
IPV6_PRIVACY=no
PEERDNS=no
[root@h48 ~]# systemctl restart NetworkManager
[root@h48 ~]# cat /etc/resolv.conf
# Generated by NetworkManager
nameserver 240e:5a::6666
nameserver 240e:5b::6666
这时我们再执行web访问请求:
[root@h48 ~]# curl -v  https://test.ipw.cn/
*   Trying 240e:e9:900e:22:3e::12...
* TCP_NODELAY set
* Connected to test.ipw.cn (240e:e9:900e:22:3e::12) port 443 (#0)
* ALPN, offering h2
* ALPN, offering http/1.1
* successfully set certificate verify locations:
*   CAfile: /etc/pki/tls/certs/ca-bundle.crt
  CApath: none
* TLSv1.3 (OUT), TLS handshake, Client hello (1):
^C
这次发现dns解析慢的问题解决了,但是结果依然和之前是一样的,卡在Client hello上。 看起来tcp握手已经完成,两边之间没有明显的连通性问题,这种情况一般都发生在MTU上。IPv6和IPv4的一个区别就是IPv6在包的中间传输过程中是不能被分片的,因此如果源主机发送的数据包大小比中间某个节点的MTU还大,这个数据包会被丢弃。 ![[Pasted image 20230613092646.png]] 从上述抓包可以看出,HTTPS客户端发送了Client Hello,没有成功收到HTTPS服务端的Server Hello,我们可以看下序号为31的异常包,这个包在Info里提示是TCP Previous segment not captured,也就是说前面有其他包没收到。这个包的Seq是2881,握手之后,HTTPS服务端传过来的其他包Len都是0,我们错过了2880个字节,这个值除于2是1440,也就是说路上可能丢了两个包。这个推断以SYN,ACK包的MSS值为依据的: ![[Pasted image 20230613112431.png]] 这个丢包发生的地方应该就是我们作为路由器的U-Router机器,我们在/etc/ppp/peers/pppoe_dial里设置MTU的值为1452,从HTTPS服务端返回的Server Hello包会被直接丢弃:1440的MSS+TCP头20字节加上20字节的IPv6头+8字节的PPPoE已经远远超过1452这个MTU。 题外话:实际上我们如果强制不设置MTU,pppd拨号时会自动设置MTU为1492,以太网默认的MTU是1500字节,需要去除6个字节的PPPoE session和2个字节的ppp协议。 为了验证这个问题,我们可以将A-Node上enp0s8接口的MTU改成和U-Router一样的1452。
[root@h48 ~]# ip link set mtu 1452 dev enp0s8
[root@h48 ~]# ip addr
1: lo: <LOOPBACK,UP,LOWER_UP> mtu 65536 qdisc noqueue state UNKNOWN group default qlen 1000
    link/loopback 00:00:00:00:00:00 brd 00:00:00:00:00:00
    inet 127.0.0.1/8 scope host lo
       valid_lft forever preferred_lft forever
    inet6 ::1/128 scope host
       valid_lft forever preferred_lft forever
2: enp0s3: <BROADCAST,MULTICAST,UP,LOWER_UP> mtu 1500 qdisc fq_codel state UP group default qlen 1000
    link/ether 08:00:x:x:x:40 brd ff:ff:ff:ff:ff:ff
    inet 192.168.1.3/24 brd 192.168.1.255 scope global dynamic noprefixroute enp0s3
       valid_lft 553879571sec preferred_lft 553879571sec
    inet6 fe80::a00:x:x:a240/64 scope link
       valid_lft forever preferred_lft forever
3: enp0s8: <BROADCAST,MULTICAST,UP,LOWER_UP> mtu 1452 qdisc fq_codel state UP group default qlen 1000
    link/ether 08:00:x:x:x:cf brd ff:ff:ff:ff:ff:ff
    inet 192.168.56.107/24 brd 192.168.56.255 scope global dynamic noprefixroute enp0s8
       valid_lft 530sec preferred_lft 530sec
    inet6 240e:x:x:55e7:95a6:x:x:7e41/64 scope global dynamic noprefixroute
       valid_lft 86400sec preferred_lft 14400sec
    inet6 fe80::1b2d:x:x:2477/64 scope link noprefixroute
       valid_lft forever preferred_lft forever
[root@h48 ~]#  curl -v  https://test.ipw.cn/
*   Trying 240e:e9:900e:22:3e::12...
* TCP_NODELAY set
* Connected to test.ipw.cn (240e:e9:900e:22:3e::12) port 443 (#0)
* ALPN, offering h2
* ALPN, offering http/1.1
* successfully set certificate verify locations:
*   CAfile: /etc/pki/tls/certs/ca-bundle.crt
  CApath: none
* TLSv1.3 (OUT), TLS handshake, Client hello (1):
* TLSv1.3 (IN), TLS handshake, Server hello (2):
* TLSv1.2 (IN), TLS handshake, Certificate (11):
* TLSv1.2 (IN), TLS handshake, Server key exchange (12):
* TLSv1.2 (IN), TLS handshake, Server finished (14):
* TLSv1.2 (OUT), TLS handshake, Client key exchange (16):
* TLSv1.2 (OUT), TLS change cipher, Change cipher spec (1):
* TLSv1.2 (OUT), TLS handshake, Finished (20):
* TLSv1.2 (IN), TLS handshake, Finished (20):
* SSL connection using TLSv1.2 / ECDHE-RSA-AES128-GCM-SHA256
* ALPN, server accepted to use h2
* Server certificate:
*  subject: CN=test.ipw.cn
*  start date: Sep 24 00:00:00 2022 GMT
*  expire date: Sep 24 23:59:59 2023 GMT
*  subjectAltName: host "test.ipw.cn" matched cert's "test.ipw.cn"
*  issuer: C=CN; O=TrustAsia Technologies, Inc.; CN=TrustAsia RSA DV TLS CA G2
*  SSL certificate verify ok.
* Using HTTP2, server supports multi-use
* Connection state changed (HTTP/2 confirmed)
* Copying HTTP/2 data in stream buffer to connection buffer after upgrade: len=0
* Using Stream ID: 1 (easy handle 0x55b852e9b6d0)
> GET / HTTP/2
> Host: test.ipw.cn
> User-Agent: curl/7.61.1
> Accept: */*
>
* Connection state changed (MAX_CONCURRENT_STREAMS == 128)!
< HTTP/2 200
< access-control-allow-origin: https://ipw.cn
< content-type: application/json;charset=UTF-8
< date: WWW, DD MMM YYYY 07:20:07 GMT
< server: SLT-MID
< x-cache-lookup: Cache Miss
< content-length: 37
< x-nws-log-uuid: 8082108861760426567
< x-cache-lookup: Cache Miss
<
* Connection #0 to host test.ipw.cn left intact
240e:x:x:55e7:95a6:x:x:7e41
这次访问成功了。
MSS Clamping
这种在A-Node上调节MTU的解决方案,适用于管理节点比较少的情形。然而,当面对大量自动创建的客户端时,这种修改就不太适用了。为了解决MTU黑洞问题,我们可以在U-Router节点上配置MSS钳制(MSS Clamping)。其原理是路由器首先根据自身的MTU计算出一个MSS值,然后检查通过它转发的每个TCP SYN和SYN/ACK包的MSS值。如果发现这个值比自身计算出的MSS值大,就使用自身计算出的MSS值来替换它。 我们先将A-Node上的MTU恢复成1500:
[root@h48 ~]# ip link set mtu 1500 dev enp0s8
[root@h48 ~]# ip addr
......
3: enp0s8: <NO-CARRIER,BROADCAST,MULTICAST,UP> mtu 1500 qdisc fq_codel state DOWN group default qlen 1000
......

[root@h48 ~]#  curl -v  https://test.ipw.cn/
*   Trying 240e:e9:900e:22:3e::12...
* TCP_NODELAY set
* Connected to test.ipw.cn (240e:e9:900e:22:3e::12) port 443 (#0)
* ALPN, offering h2
* ALPN, offering http/1.1
* successfully set certificate verify locations:
*   CAfile: /etc/pki/tls/certs/ca-bundle.crt
  CApath: none
* TLSv1.3 (OUT), TLS handshake, Client hello (1):
^C
curl 又失败了,这时我们可以在U-Router上执行如下指令:
root@hlxd:~# ip6tables -t mangle -A FORWARD -p tcp --tcp-flags SYN,RST SYN -o pppoe_dial -j TCPMSS --clamp-mss-to-pmtu
root@hlxd:~# ip6tables -t mangle -A FORWARD -p tcp --tcp-flags SYN,RST SYN -i pppoe_dial -j TCPMSS --clamp-mss-to-pmtu
这时我们返回A-Node机器执行curl指令就可以获得正常的响应。 我们这里通过ip6tables指令配置MSS钳制,实际上ip6tables只是一个套壳指令,实际上Ubuntu22.04已经全面采用nftables。我们可以通过执行ip6tables命令确认:
root@hlxd:~# ip6tables
ip6tables v1.8.7 (nf_tables): no command specified
Try `ip6tables -h' or 'ip6tables --help' for more information.
圆括号里显示是nf_tables。
root@hlxd:~# nft list ruleset
table ip6 mangle {
        chain FORWARD {
                type filter hook forward priority mangle; policy accept;
                oifname "pppoe_dial" meta l4proto tcp tcp flags & (syn|rst) == syn counter packets 1 bytes 80 # TCPMSS clamp to PMTU
                iifname "pppoe_dial" meta l4proto tcp tcp flags & (syn|rst) == syn counter packets 1 bytes 72 # TCPMSS clamp to PMTU
        }
}
DNSMASQ配置
Dnsmasq除了作为DNS配置工具之外,还可以实现DHCP和TFTP服务端的功能,当然这里的DHCP也是包含了DHCPv6和RA。有时候radvd会遇到一些莫名其妙的问题,如果解决不了,我们可以用dnsmasq来做替代。
关闭systemd-networkd的accept_ra功能
首先我们验证一个radvd无法正常工作的场景。在做这个验证前,我们需要先对系统做一个调整。 在上面的配置中,我们通过wide-dhcpv6-client可以给enp0s8分配到一个IPv6的地址:
3: enp0s8: <BROADCAST,MULTICAST,UP,LOWER_UP> mtu 1500 qdisc fq_codel state UP group default qlen 1000
    link/ether 08:00:x:x:4b:e9 brd ff:ff:ff:ff:ff:ff
    inet 192.168.56.103/24 metric 100 brd 192.168.56.255 scope global dynamic enp0s8
       valid_lft 551sec preferred_lft 551sec
    inet6 240e:x:x:55e8:7987:x:x:2c11/64 scope global
       valid_lft forever preferred_lft forever
    inet6 fe80::x:x:x:4be9/64 scope link
       valid_lft forever preferred_lft forever
这时候,如果我们启动radvd,系统会自动给enp0s8分配一个新的IPv6地址:
root@hlxd:/etc/wide-dhcpv6# systemctl start radvd
root@hlxd:/etc/wide-dhcpv6# ip add
......
3: enp0s8: <BROADCAST,MULTICAST,UP,LOWER_UP> mtu 1500 qdisc fq_codel state UP group default qlen 1000
    link/ether 08:00:x:x:4b:e9 brd ff:ff:ff:ff:ff:ff
    inet 192.168.56.103/24 metric 100 brd 192.168.56.255 scope global dynamic enp0s8
       valid_lft 468sec preferred_lft 468sec
    inet6 240e:x:x:55e8:a00:x:x:4be9/64 scope global dynamic mngtmpaddr noprefixroute
       valid_lft 86399sec preferred_lft 14399sec
    inet6 240e:x:x:55e8:7987:x:x:2c11/64 scope global
       valid_lft forever preferred_lft forever
    inet6 fe80::x:x:x:4be9/64 scope link
       valid_lft forever preferred_lft forever
这个从RA中自动配置地址的功能不是内核提供的,从内核参数可以看到这个功能是禁用:
root@hlxd:/etc/wide-dhcpv6# sysctl -a|grep accept_ra|grep enp0s8
net.ipv6.conf.enp0s8.accept_ra = 0
因此可以推断它是systemd-networkd在用户级应用上实现的。为了排除测试干扰,我们可以通过配置netplan将enp0s8 accept_ra的功能禁用:
root@hlxd:/etc/netplan# cat 00-installer-config.yaml
# This is the network config written by 'subiquity'
network:
  ethernets:
    enp0s3:
      addresses: [192.168.1.2/24]
        #link-local: []
      nameservers:
        addresses: [223.5.5.5]
    enp0s8:
      accept-ra: false
      dhcp4: true
  version: 2
root@hlxd:/etc/netplan# netplan try
Do you want to keep these settings?


Press ENTER before the timeout to accept the new configuration


Changes will revert in 120 seconds
Configuration accepted.
重启wide-dhcpv6-client和radvd服务,这时可以观察到如下输出,也就是说从RA上获取第二个IPv6地址的干扰已经排除:
3: enp0s8: <BROADCAST,MULTICAST,UP,LOWER_UP> mtu 1500 qdisc fq_codel state UP group default qlen 1000
    link/ether 08:00:x:x:4b:e9 brd ff:ff:ff:ff:ff:ff
    inet 192.168.56.103/24 metric 100 brd 192.168.56.255 scope global dynamic enp0s8
       valid_lft 473sec preferred_lft 473sec
    inet6 240e:x:x:55e8:ad6f:x:x:11d0/64 scope global
       valid_lft forever preferred_lft forever
    inet6 fe80::x:x:x:4be9/64 scope link
       valid_lft forever preferred_lft forever
验证radvd失败场景
我们再来修改下wide-dhcpv6的配置,使enp0s8获取到/60的前缀地址。
vroot@hlxd:/etc/wide-dhcpv6# cat dhcp6c.conf
id-assoc pd 0 {
        prefix ::/60   86900 87200;
        prefix-interface enp0s8 {
                sla-id 8;
                sla-len 0;  # 此处sla-len从4改成0
                ifid-random;
        };
};
root@hlxd:/etc/wide-dhcpv6# systemctl restart wide-dhcpv6-client
root@hlxd:/etc/wide-dhcpv6# ip addr
......
3: enp0s8: <BROADCAST,MULTICAST,UP,LOWER_UP> mtu 1500 qdisc fq_codel state UP group default qlen 1000
    link/ether 08:00:x:x:4b:e9 brd ff:ff:ff:ff:ff:ff
    inet 192.168.56.103/24 metric 100 brd 192.168.56.255 scope global dynamic enp0s8
       valid_lft 457sec preferred_lft 457sec
    inet6 240e:x:x:55e0:4858:x:x:991e/60 scope global
       valid_lft forever preferred_lft forever
    inet6 fe80::x:x:x:4be9/64 scope link
       valid_lft forever preferred_lft forever
root@hlxd:/etc/wide-dhcpv6# systemctl restart radvd
重启radvd之后,我们在A-Node这个客户端机器上重启下网卡:
[root@h48 ~]# nmcli c up enp0s8
Connection successfully activated (D-Bus active path: /org/freedesktop/NetworkManager/ActiveConnection/11)
[root@h48 ~]# ip addr
3: enp0s8: <BROADCAST,MULTICAST,UP,LOWER_UP> mtu 1500 qdisc fq_codel state UP group default qlen 1000
    link/ether 08:00:c:c:23:cf brd ff:ff:ff:ff:ff:ff
    inet 192.168.56.107/24 brd 192.168.56.255 scope global dynamic noprefixroute enp0s8
       valid_lft 596sec preferred_lft 596sec
    inet6 fe80::c:c:c:2477/64 scope link noprefixroute
       valid_lft forever preferred_lft forever
并没有如愿从路由通告中获取到IPv6地址。
安装dnsmasq
我们开始尝试在U-Router机器上用dnsmasq来替换radvd,首先安装这个软件
root@hlxd:~# apt install dnsmasq
Reading package lists... Done
Building dependency tree... Done
Reading state information... Done
The following additional packages will be installed:
  dns-root-data dnsmasq-base
Suggested packages:
  resolvconf
The following NEW packages will be installed:
  dns-root-data dnsmasq dnsmasq-base
0 upgraded, 3 newly installed, 0 to remove and 11 not upgraded.
Need to get 379 kB of archives.
After this operation, 974 kB of additional disk space will be used.
Do you want to continue? [Y/n] y
Get:1 http://cn.archive.ubuntu.com/ubuntu jammy/main amd64 dns-root-data all 2021011101 [5,256 B]
Get:2 http://cn.archive.ubuntu.com/ubuntu jammy-updates/main amd64 dnsmasq-base amd64 2.86-1.1ubuntu0.3 [354 kB]
Get:3 http://cn.archive.ubuntu.com/ubuntu jammy-updates/universe amd64 dnsmasq all 2.86-1.1ubuntu0.3 [19.2 kB]
Fetched 379 kB in 2s (231 kB/s)
Selecting previously unselected package dns-root-data.
(Reading database ... 125344 files and directories currently installed.)
Preparing to unpack .../dns-root-data_2021011101_all.deb ...
Unpacking dns-root-data (2021011101) ...
Selecting previously unselected package dnsmasq-base.
Preparing to unpack .../dnsmasq-base_2.86-1.1ubuntu0.3_amd64.deb ...
Unpacking dnsmasq-base (2.86-1.1ubuntu0.3) ...
Selecting previously unselected package dnsmasq.
Preparing to unpack .../dnsmasq_2.86-1.1ubuntu0.3_all.deb ...
Unpacking dnsmasq (2.86-1.1ubuntu0.3) ...
Setting up dnsmasq-base (2.86-1.1ubuntu0.3) ...
Setting up dns-root-data (2021011101) ...
Setting up dnsmasq (2.86-1.1ubuntu0.3) ...
Created symlink /etc/systemd/system/multi-user.target.wants/dnsmasq.service → /lib/systemd/system/dnsmasq.service.
Job for dnsmasq.service failed because the control process exited with error code.
See "systemctl status dnsmasq.service" and "journalctl -xeu dnsmasq.service" for details.
invoke-rc.d: initscript dnsmasq, action "start" failed.
× dnsmasq.service - dnsmasq - A lightweight DHCP and caching DNS server
     Loaded: loaded (/lib/systemd/system/dnsmasq.service; enabled; vendor preset: enabled)
     Active: failed (Result: exit-code) since Tue 2023-06-13 08:58:57 UTC; 5ms ago
    Process: 3269 ExecStartPre=/etc/init.d/dnsmasq checkconfig (code=exited, status=0/SUCCESS)
    Process: 3277 ExecStart=/etc/init.d/dnsmasq systemd-exec (code=exited, status=2)
        CPU: 22ms

MMM DD 08:58:57 hlxd systemd[1]: Starting dnsmasq - A lightweight DHCP and caching DNS server...
MMM DD 08:58:57 hlxd dnsmasq[3277]: dnsmasq: failed to create listening socket for port 53: Address already in use
MMM DD 08:58:57 hlxd dnsmasq[3277]: failed to create listening socket for port 53: Address already in use
MMM DD 08:58:57 hlxd dnsmasq[3277]: FAILED to start up
MMM DD 08:58:57 hlxd systemd[1]: dnsmasq.service: Control process exited, code=exited, status=2/INVALIDARGUMENT
MMM DD 08:58:57 hlxd systemd[1]: dnsmasq.service: Failed with result 'exit-code'.
MMM DD 08:58:57 hlxd systemd[1]: Failed to start dnsmasq - A lightweight DHCP and caching DNS server.
Processing triggers for man-db (2.10.2-1) ...
Processing triggers for dbus (1.12.20-2ubuntu4.1) ...
Scanning processes...
Scanning linux images...

Running kernel seems to be up-to-date.

No services need to be restarted.

No containers need to be restarted.

No user sessions are running outdated binaries.

No VM guests are running outdated hypervisor (qemu) binaries on this host.
配置dnsmasq
dnsmasq的配置文件在/etc/dnsmasq.conf,对于这个文件,我们做如下配置:
root@hlxd:/etc# egrep -v "^#|^$" dnsmasq.conf
port=0
dhcp-range=::,constructor:enp0s8,ra-only,slaac
enable-ra
对于启用systemd-networkd的系统,systemd-resolved是默认的dns提供者,因此我们不需要dnsmasq实现dns功能,可以通过port=0 禁用dns它。后面两条配置用于启用RA。
停止radvd服务,启动dnsmasq服务:
root@hlxd:/etc# systemctl stop radvd
root@hlxd:/etc# systemctl start dnsmasq
返回A-Node客户端节点,这时我们可以发现IPv6地址已经配置到enp0s8接口上:
```bash [root@h48 ~]# ip addr …… 3: enp0s8: <BROADCAST,MULTICAST,UP,LOWER_UP> mtu 1500 qdisc fq_codel state UP group default qlen 1000 link/ether 08:00:x:x:23:cf brd ff:ff:ff:ff:ff:ff inet 192.168.56.107/24 brd 192.168.56.255 scope global dynamic noprefixroute enp0s8 valid_lft 378sec preferred_lft 378sec inet6 240e:x:x:55e0:72ac:x:x:164c/64 scope global noprefixroute valid_lft forever preferred_lft forever inet6 fe80::x:x:x:2477/64 scope link noprefixroute valid_lft forever preferred_lft forever